jasonchildress wroteSurf.Whammy wrote...as a rule I limit each NOTION score to 20 staves...
If it were practicable, this would be a good idea, and I think it would obviate the two problems I've recently been having with my overloaded scores:
1) the overall sound getting overloaded and "shorting out"
2) random notes not playing when I plot them on the staff
The challenge is that my compositions tend to be quite complex, requiring many more than twenty instruments; so I'm not sure how I would put your idea into practice and still be able to play back the entire piece as I'm creating it.
The key to this strategy is to use a Digital Audio Workstation (DAW) application for producing, mixing, and mastering . . . As shown in the following diagram, you begin with a NOTION score that is the Basic Rhythm Section for your composition; and you do this in NOTION running by itself. Save the NOTION score with a meaningful name that has "-PT-1" as the suffix (for example, "Song-PT-1.notion") . . .
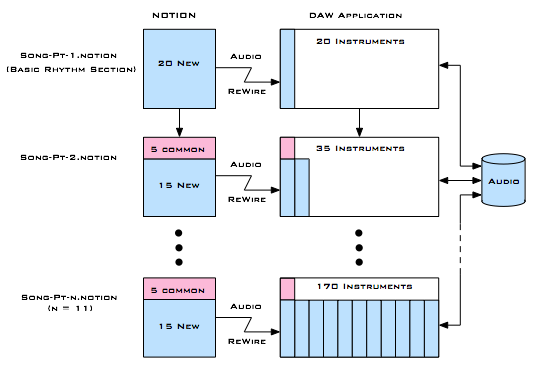
Once you have the Basic Rhythm Section the way you like it in terms of the various structural sections of the composition (verse, chorus, bridge, interlude, and so forth), you can exit NOTION and start the DAW application, followed by starting NOTION, which begins a ReWire session where the DAW application is the ReWire host controller and NOTION is a ReWire slave . . .
Do the mapping of instrument tracks in the NOTION mixer to ReWire channel pairs; connect it to 20 stereo tracks in the DAW application; and then record the NOTION generated audio as soundbites or raw audio clips in the DAW application . . .
At this point, the NOTION generated audio is stored in the DAW application project on a hard drive as high-quality raw audio and is available on the 20 tracks in the DAW application mixer . . .
Save everything, and then do a "Save As . . . " of the NOTION score to create a synchronized clone, which you will name for example "Song-PT-2.notion" . . .
I usually keep 5 of the instruments in the NOTION score common so that if I want to work with NOTION by itself there are reference instruments (bass, kick drum, piano, melody instrument, counterpoint instrument). This is flexible, but as a rule I keep 5 instruments common most of the time . . .
[
NOTE: The outputs of the tracks in the NOTION Mixer need to be routed to ReWire channel pairs when you are working in a ReWire session, but when you decide to work with NOTION by itself then you need to change the output routing in the NOTION Mixer to "Output" so that you hear the audio. The rule on this is that in a ReWire session, the host controller is responsible for presenting the audio and the ReWire slaves only send their audio to the ReWire host controller, so you only hear (a) already recorded audio in the DAW project and (b) audio sent from the ReWire slaves. When NOTION is running by itself, it is responsible for presenting the audio, which requires changing the output for each channel you want to hear to "Output" (which actually is "Master" in the drop-down list, but so what) . . . ]
At this point, you can start working in ReWire sessions, since the audio for the already recorded instruments now is in the DAW application. The presentation of audio is handled by the ReWire host controller, which is the DAW application . . .
When you are working on "Song-PT-2.notion", 20 of the instruments are in the DAW application, but you have 15 new instruments that are sending their audio to the DAW application, so (a) you hear everything but (b) you can control what you hear via Solo, Mute, and so forth . . .
Once you finish the work on the next set of 15 instruments, you can record them as soundbites in the DAW application and then clone the NOTION score to create "Song-PT-3.notion", where you can add another 15 instruments; and so forth and so on . . .
When the total number of tracks in the DAW application is around 50, I like to start doing submixes of different instrument sections, where for example I might do a submix of ensemble woodwinds to combine several individual woodwind instruments into a section, where the submix, which is one stereo track in the DAW application mixer, replaces perhaps 5 to 10 separate woodwind tracks. The original audio for the 5 to 10 woodwind tracks is stored on disk, but it is replaced in the mix by a single stereo submix track. This reduces the number of tracks in the DAW application mixer and keeps it manageable. Effectively, a submix is a
layer; and you are building a song in layers, because it is not practical to have 100 or more tracks in a DAW application mixer, since (a) you cannot see all of them at once and (b) it is entirely too busy to be useful for high-level producing. In other words, you want to keep the total number of tracks in the DAW application mixer at a maximum of 50 at any given time, which is plenty for submix tracks and any solo instrument tracks that you want to keep separate so that you have more intimate control when producing; but even at 50 tracks it probably requires a bit of horizontal scrolling to get to all the tracks, so it tends to be better as the song progresses to do more submixes, which you always can revisit if necessary, because the original raw audio is there unless you intentionally delete it. Most DAW applications support non-destructive editing in one way or another. When you do a submix, the various effects are applied, hence this also makes more system memory and resources available when a single stereo submix track replaces a set of tracks (monaural and stereo) that have separate effects on a per track basis . . .
[
NOTE: In the early-1950s, everything started with one-track analog magnetic tape machines and then moved to two-track machines. By the time the Beatles were recording "Sgt. Pepper's Lonely Hearts Club Band", there were 8-track machines, but Abbey Road Studios only had 4-track machines, so instead of using a set of 8-track machines, they used a set of 4-track machines to do multitrack recording, producing, and mixing. This is the way it works in the digital universe, as well, but instead of being constrained by the number of tracks on a tape machine, it is a matter of processor and system memory resources which need to be managed just as vigorously toward the goal of creating a virtual digital workspace where there are no constraints . . . ]
Done this way, for all practical purposes there is no upper limit to the number of instruments and voices (real and virtual) you can have in a project; and one of the fascinating aspects is that you can do things that cannot be done easily with a real orchestra. For example, you can spread the notes of a single instrument over 8 tracks that you have panned to different locations, which is a technique I call "sparkling" and is an excellent way to put the notes of a single instrument into motion with very precise control, as heard in the following YouTube music video where a Psaltery Harp is "sparkled". In the NOTION score, there are 8 Psaltery Harp staves, each panned to a different location; so if you want a Psaltery Harp note heard at far-left, then you put it on the far-left panned staff at the correct time in the measure. It takes a while to separate the notes of what normally is one staff and to spread them over 8 staves, but (a) it works and (b) it is very precise . . .
[
NOTE: The primary locations other than far-left, top-center, and far-right are drawn using a linear scale, but in practice they are logarithmic. The dotted curve and yellow triangles show an approximately of the pan law, which maps to the respective volume level at each of the locations. The rainbow panning arc runs from -90 to +90 degrees, with 0 degrees being top-center . . . ]

[
NOTE: The motion effect is heard most distinctly and dramatically when you listen with headphones, but it also works when you listen with studio monitors. When listening with studio monitors the reverberation triggers localization due to the Haas Effect, which makes reduces the affect of the panning. This example was done primarily for headphone listening, so for studio monitor listening there are a few more things that need to be done to reduce or to eliminate the Haas Effect. For reference, there is a virtual festival of rules for panning, and some of the rules are logarithmic. Causing a sound to be perceived as coming from a specific location other than far-left, middle (or "top-center"), and far-right is not just a matter of moving the panning knob. There is more to panning than just the Pan Law and Haas Effect. It is easier to do elaborate panning when the target is headphone listening, because with headphone listening each ear hears something completely separate and independent, which is not the case when listening with studio monitors, where each ear hears some of what the other ear hears. This is one of the many reasons it is necessary to be very careful with reverberation and echoes. In particular, reverberation tends strongly to introduce the Haas Effect in a way that is not easy to control, which for all practical purposes (a) destroys precise spatial localization and (b) usually introduces undesired distortion and general sonic blurring. Reverberation also requires significant sonic space to be perceived as a dominant effect . . . ]
Haas Effect (Wikipedia)Panning (Wikipedia)Pan Law (Wikipedia)Auditory Spatial Attention (Wikipedia)[
NOTE: It is enlightening to compare the two versions of "You Don't Own Me" (Lesley Gore), where the first is the 45 RPM record and the second is a live performance where there is not massive reverberation on all the instruments. The 45 RPM record is mixed to sound good on radio and jukeboxes, while the live version is more realistic and has much better bass and snare drum rimshots, hence more energy. The overall volume levels are different, but you can adjust them to do a comparison. For reference, the level for the singing, including the effects, in the live performance is set so that it works when she starts singing forte at approximately 1:04 in the song. The level and singing style is more constrained overall to be consistent in the 45 RPM record . . . ]
THOUGHTSUsing this technique, there is virtually no limit to the number of real and virtual instruments and voices you can have in a song or other type of musical composition . . .
As noted (
see above), it also makes it possible to do things that cannot be done with a real orchestra, where for example you can spread the notes of a single instrument across several instrument staves in the NOTION score where you pan each stave and its notes to a different location in the NOTION Mixer, which you then can adjust in the DAW Mixer once the NOTION generated audio is recorded in the DAW project as soundbites . . .
If you wander into 7.2 surround sound and the DAW application supports it, you can have the notes of a single trumpet played all over the room in at least 7 different locations; and since in 7.2 surround sound there are separate front, side, and back loudspeaker units, I suppose you can have several separate orchestras, which certainly is not something that can be done in a practical way in the real world. If you want stereo orchestras, then there are quite a few possible combinations, including the traditional front-stereo and back-stereo flavors. For example, you can mix an orchestra to be stereo using left-side and left-front, where left-side maps to "left" and left-front maps to "right" . . .
It might take a while, but the effect can be fascinating--like a set of orchestras on a carousel where the listener is in the center and the carousel is spinning slowly--but this type of circular motion also can be varied, since there are few restrictions other than the amount of time you want to devote to doing the composing, producing, mixing, and mastering . . .
I keep the NOTION scores for a song in a common folder, and by following a few simple rules it is possible and practical to make changes as the project develops. Ideally, you want to determine the overall structure (verse, chorus, bridge, interlude, and so forth) when you are doing the Basic Rhythm Section, which for a
Classical composition might be a "Sketch" . . .
However, it is possible to change the overall structure of a composition; and since you have all the NOTION scores, you can recreate either (a) the entire composition or (b) selected parts of the composition, which certainly can include making a few revisions to specific instrumental parts as the composition progresses, where you just need to open the NOTION score where the particular instrument appears and then you can edit it and record a new soundbite in the DAW application for the particular instrument, which is something I do occasionally when I think a specific note for an instrument needs to be changed . . .
For real instruments and singing, this is done via overdubbing, but the concept is the same; and if you decide to add a new verse, you can add the music notation and record the new NOTION generated audio after doing a bit of cutting and pasting in the DAW project to add the required number of measures. Then, you just need to overdub the real instruments and singing for the new verse, which is what I did with "Feel Me" (The Surf Whammys) when I added a new third verse, where originally there were two verses with the last verse being a repeat of the first verse but a different real lead guitar and singing performance, where the strategy was to divide the real instrument and singing into two audio clips to preserve the original first, second, and last verse and then to insert blank measures in the DAW project for the new NOTION instrumentation and the overdubbed lead guitar and singing for the new third verse, which works very smoothly and for all practical purposes is transparent. If you did not know I added a third verse, I think it just appears that song always had four verses (three verses and a repeat of the first verse), which is fabulous . . .
[
NOTE: This is "hotter" in volume level than the "Sparkled Psaltery Harp" YouTube video, so lower the volume a bit before playing it . . . ]
Fabulous! 
P. S. Another advantage of this strategy is that you can have more effects plug-ins in the DAW project, because the DAW application is
not doing the virtual instrument music notation work, so it has more system memory available and operates under a different set of limitations and so forth . . .
[
NOTE: The total system memory is the same, but in a ReWire session done this way, the DAW application is focused and NOTION is focused, so whatever other limitations they might have are managed better. On the NOTION side when you are using VSTi virtual instruments, the VSTi virtual instrument engines use resources for processing, and this is another consideration. It is not simply a matter of system resources, and your Mac Pro (Early 2008) has the maximum amount of system memory other than doing a doubling thing, which can be done with system memory from Other World Computing but at a very expensive cost. 32GB of system memory is fantastic, really. At present, I have 20GB of system memory on my Mac Pro (Early 2008), and it works nicely. I need to upgrade the video processor, but it is a bit expensive, so it is on the list of "Things to Do" . . . ]
In other words, this strategy focuses NOTION on music notation and generating high-quality audio for virtual instruments, done in conjunction with any VSTi virtual instrument engines you are using in the NOTION score. All the effects work is moved to the DAW project, which is the optimal way to ensure that each application (NOTION and DAW) has the most resources available for what it needs to do . . .
As a general rule, I save everything frequently and about every hour or two exit the applications in the ReWIre session and then start a new ReWire session. This clears all the ReWire buffers and starts everything in a pristine state. It takes perhaps 5 or so minutes, and it avoids problems . . .
Lots of FUN!