Make Better Mixes with “Selective EQ”
By Craig Anderton
Good mixes often depend on carving out a unique sonic space for each instrument, so you can hear them clearly. Sometimes carving out that space involves level, like making an instrument softer so that another instrument seems louder. A more sophisticated approach involves EQ, like dipping a piano’s midrange to make more room for the voice.
This tip dives deeper into using EQ to carve out space. It combines spectrum metering with either static or dynamic EQ to make sure two instruments support each other, rather than make one instrument subservient to another.
The four short audio examples have lead guitar and slide guitar playing together. I wanted the lead to be the highlight, but didn’t want to lose the importance of the fluid, aggressive slide guitar in the background. Here’s how I convinced them to coexist.
The first audio example plays the lead solo and slide guitar together. You can almost hear them fighting to try and be the top dog…but we’ll fix that.
Meet Team Spectrum Meter and Pro EQ
The top of Fig. 1 shows the spectrum analysis of the lead guitar part. Unlike the EQ’s spectrum meter, the plugin’s FFT mode can average the level, and retain an infinite hold time. This is key, because the curve unambiguously shows which frequencies are more prominent in the lead guitar part.
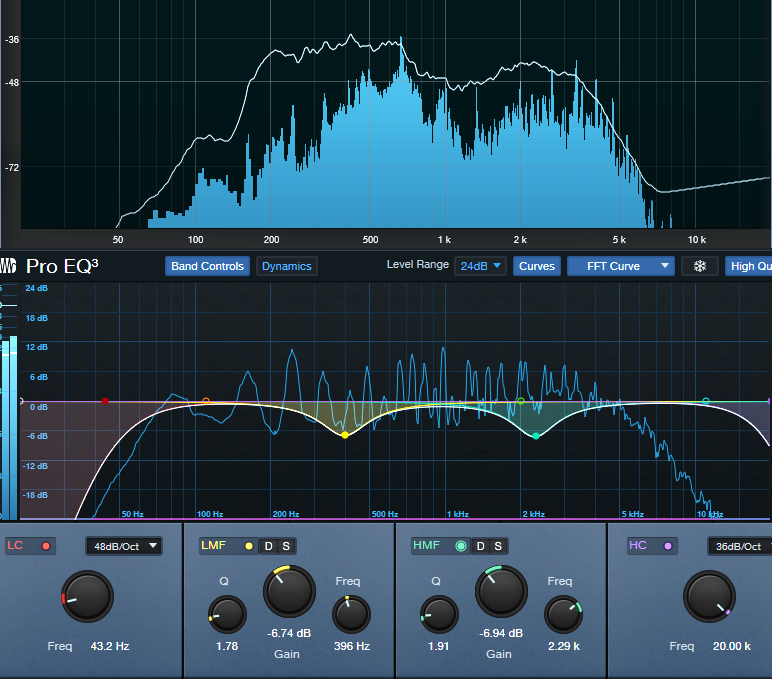
Figure 1: The top image shows the lead guitar’s spectral response. The lower image shows the compensation EQ curve applied to the underlying slide guitar part. The upper row of EQ controls isn’t shown, because its controls aren’t used.
The second audio example uses the static EQ curve in fig. 1 to reduce these frequencies in the slide part. This opens up space for the lead. Now there’s more differentiation between the lead and slide, but the slide still comes through well.
Next, we’ll take this further with dynamic EQ (fig. 2).

Figure 2: Settings for dynamic EQ. Again, the upper row of EQ controls isn’t shown, because its controls aren’t used.
The next audio example uses dynamic EQ, so the slide guitar becomes more prominent in the spaces between notes played by the lead guitar. Now instead of fighting with each other, the lead guitar and slide take turns sharing the spotlight.
Using dynamic EQ is not necessarily better than using static EQ. It depends on the musical context. If you want only the lead to be more prominent, the static EQ sounds better. Because I wanted both parts to be equally important—just better differentiated—I preferred the dynamic EQ.
The final audio example takes the old-school approach of simply lowering the slide guitar part’s level, without any EQ changes. The lead is more prominent, but the overall sound is less interesting and lively compared to how it sounds with EQ (especially dynamic EQ).
But Wait…There’s More!
There’s also a bonus audio example. I posted an Atmos binaural mix of the complete song (headphones only), and a conventional stereo mix (speakers or headphones), on my YouTube channel. These let you hear the tracks above in context, but the examples also provide a follow-up to previous posts about how modest home studios with no surround system can take advantage of Atmos.
The mix is denser than the previous Atmos vs. stereo example mentioned in the blog postRelease Your Music in Stereo and Immersive, and uses the technique described in Make Stereo Downmixes Feel More Immersive. If you haven’t taken advantage of Atmos yet, listen to the binaural Atmos version for headphones, then listen to the conventional stereo version. Despite my efforts to make the stereo version sound as much like the Atmos version as possible, the Atmos mix is fuller, bigger, and has more depth. Remember, all you need to get started with Atmos mixing is Studio One Professional and a set of headphones. Give it a shot!
Multitimbral Magic with MIDI Guitar
By Craig Anderton
MIDI guitars are a niche product, because the learning curve can be daunting for some guitar players. However, I’m surprised how many professionals have adopted MIDI guitar not as a guitar replacement, but as a creative, expressive voice that neither guitars nor keyboards can duplicate.
Thanks to ongoing controller improvements, and a better understanding of what MIDI guitar does best, I’m using it more than ever. But a big part of my renewed interest in MIDI guitar is Studio One’s MPE support, and the ability to let a single MIDI guitar serve as multiple simultaneous External Devices. Let’s dig deeper.
Most MIDI guitars offer two playing modes:
- Poly mode, where all data from all strings appears over 1 channel.
- Mono mode, where each string generates data over its own MIDI channel.
With multitimbral instruments, a MIDI guitar in mono mode can use each string to drive its own instrument. For example, the bottom three strings could drive a bass, while the upper three strings drive a polysynth sound. In theory, that’s cool—but there’s a drawback. In some applications, you might prefer to have the polysynth sound respond to all six strings. Yet, mono mode reserves three of those strings for bass.
Fortunately, Studio One has a simple solution: Create two MIDI guitar External Devices. Set up one for Mono mode, and the other for Poly mode (or if available, MPE mode—or even External Devices for all three modes). Then, drive the bass strings with the Mono mode external device, and the polysynth sound with the Poly or MPE mode device. Here’s how to do it.
Setting Up the External Devices
Creating the external devices for Mono and Poly modes is simple (fig. 1). The only difference is that the Mono mode device selects Split Channels, while the Poly device does not.
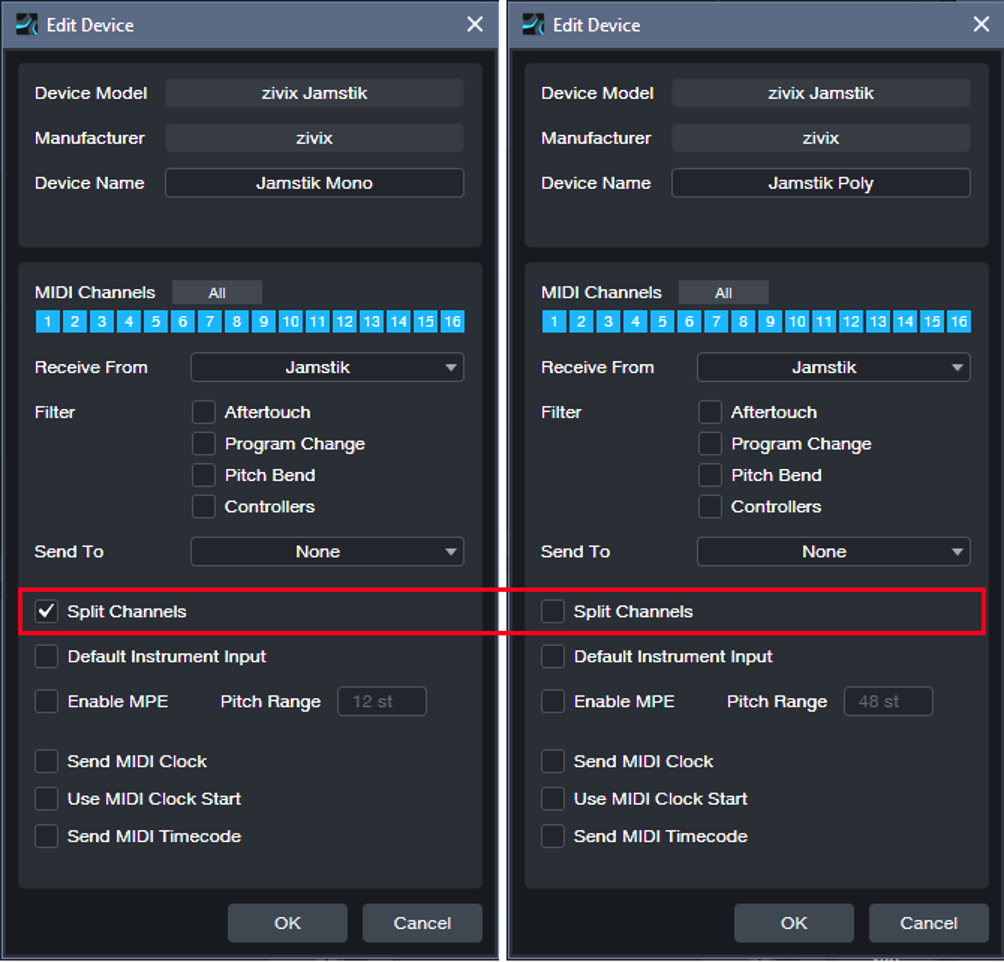
Figure 1: External Device setup for (left) Mono and (right) Poly mode MIDI guitar, using the Zivix Jamstik.
Fig. 2 shows the Studio One setup. SampleTank’s Polysynth responds to data over Channel 1. It also has three bass presets that respond to data over channels 4, 5, and 6.
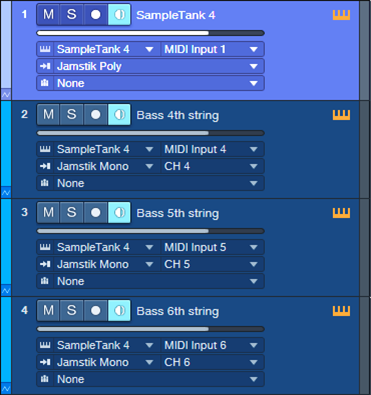
Figure 2: Track setup for driving a multitimbral synth with MIDI guitar.
Tracks 2, 3, and 4 use the Mono mode external device. These tracks accept data from channels 4, 5, and 6 respectively, which correspond to the guitar’s three bottom strings. The tracks output their data to the like-numbered SampleTank channels. That takes care of driving the bass presets.
Meanwhile, Track 1 uses the Poly mode external device. So, SampleTank’s Polysynth preset responds to all MIDI data coming in from all the guitar strings. Now we’ve layered chords played by the Polysynth with bass notes from the bass presets.
Enter MPE
My main guitar controller, the Jamstik Classic MIDI Guitar, offers an MPE mode in addition to Mono and Poly. Studio One’s MPE implementation doesn’t support using channelized multitimbral instruments with MIDI guitar. However, this is not an issue with Studio One’s bundled instruments, which aren’t multitimbral but support MPE. So, my third External Device for Jamstik is set up for MPE. External Device setup is like any other MPE controller. Tick the Enable MPE check box, choose the MIDI controller in Receive From, and select the appropriate Pitch Range (typically 48 semitones).
In the example given above, SampleTank doesn’t support MPE so it was necessary to use Poly mode to control its Polysynth sound. Poly mode has limitations, like not handling string bending for individual strings, and more tracking issues than Mono mode. But if we use the Jamstik’s MPE mode to drive the MPE-friendly Mai Tai, we can layer the Mai Tai’s polysynth presets with SampleTank’s bass sound. Compared to Poly mode, using MPE with the Mai Tai gives better tracking and per-string note bends that don’t influence other notes that are sounding. Fig. 3 shows the setup.
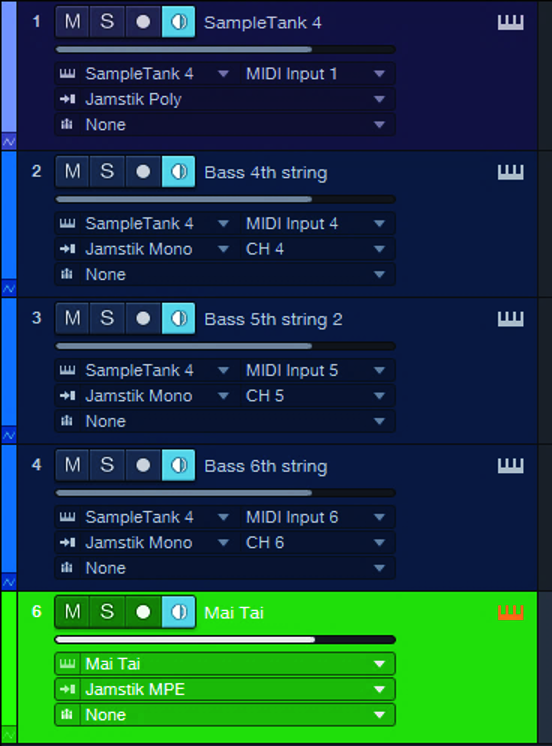
Figure 3: SampleTank and Mai Tai are layering bass sounds and a polysynth preset, respectively.
And here’s one more trick: Note that I’m still using the Poly External Device to drive SampleTank. Turning off pitch bend in SampleTank’s Polysynth eliminates most of the challenges involved with responding to Poly Mode, so the final sound becomes 3 individually articulated bass notes, 1 Mai Tai MPE synth for leads and rhythm with pitch bend articulations, and 1 layered SampleTank preset—thanks to optimized External Devices from a single MIDI guitar for each of them.
There’s no problem with using three External Devices from the same instrument. When you add another device with the same Receive From entry, Studio One will warn you that “Connecting multiple devices to the same port may lead to copied transmission of MIDI events.” You can safely ignore that, because we want copied transmission of MIDI events.
So, does it sound big? Listen to this short snippet recorded in real time with no editing, and decide for yourself.
Avoid Collaboration Concerns
By Craig Anderton
As the universe of Studio One users grows, so do opportunities for collaboration. But your collaborator may not be using the same version of Studio One as you—it could be a version of Artist that came with an interface, or the latest and greatest version of Studio One Professional. Or maybe the program wasn’t updated for some reason, like cash flow issues, or being dependent on ReWire. Fortunately, most of the time projects done in one version of Studio One can translate to other versions. So, here are some guidelines to keep in mind when collaborating.
Resolving Song Formats
Songs are generally incompatible with previous Studio One versions. However, you don’t have to transfer an entire song file. Use Export Mixdown to generate a rough premix. Whoever wants to record an overdub(s) can do so while listening to the premix. Then, the overdub stems can be exported as audio files, and added to the original project.
It’s crucial that all files have the same start point. For example, if there’s a solo halfway through the song, extend the solo’s beginning by drawing a blank section with the Paint tool. Then, bounce the blank beginning and the overdub together before exporting the stem.
Third-Party Plugin Issues
I prefer using as many native Studio One plugins as possible, not only because it’s a solid selection, but because that minimizes the chance of needing third-party plugins that one or the other person doesn’t have. However, for third-party plugins, this is an instance where subscription-based software can work in your favor. You may be able to subscribe to the plugins you don’t have for long enough to use them in a project, and then stop subscribing.
Using Professional FX Chains in Artist
If the FX Chain consists of a serial chain of effects, and both collaborators have the same plugins, the FX Chain will be compatible with both Professional and Artist. Although there’s no Channel Editor or Macro Controls in Artist, users can take advantage of the Micro Edit view in the mixer or in the Channel Overview (fig. 1). This allows editing several important parameters without having to open effects in the chain.
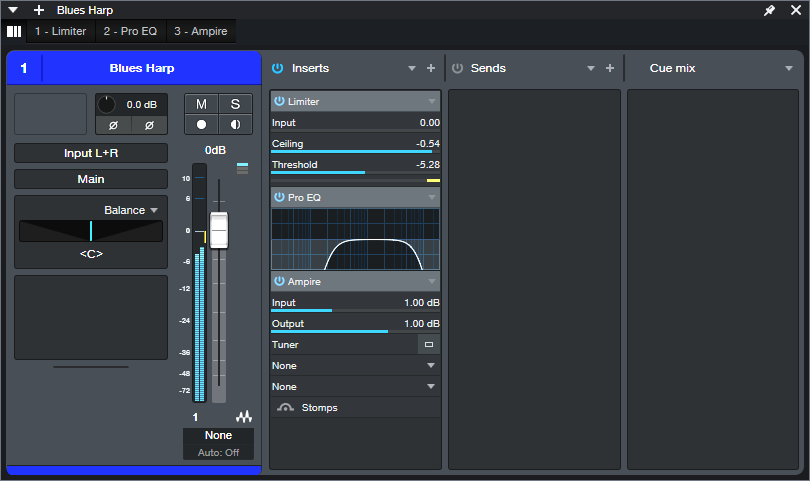
Figure 1: The Micro Edit view is useful for quick edits when the Channel Overview is open.
Missing Plugin: If an Artist user is missing a plugin you have in Professional, they’ll see an error message like fig. 2.
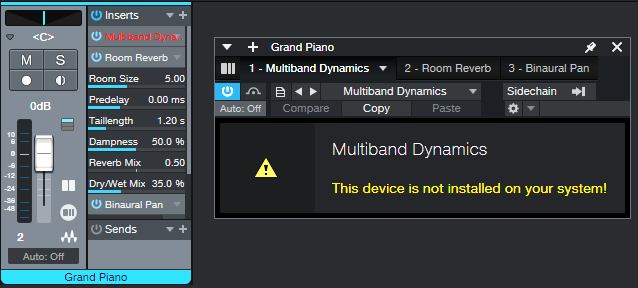
Figure 2: Studio One Artist doesn’t include the Multiband Dynamics processor.
This is helpful, because you can then substitute a plugin that gives a sound close to what’s needed (in this case, the Tricomp may work), create a new FX Chain, and send it to your collaborator.
FX Chains with a Splitter: Artist doesn’t include the Splitter, so it won’t recognize parallel paths in a Professional FX Chain that incorporates a Splitter. Instead, Artist rearranges the FX Chain to put all the effects in series (fig. 3). Note that there’s no error message to alert the user there’s a potential problem.
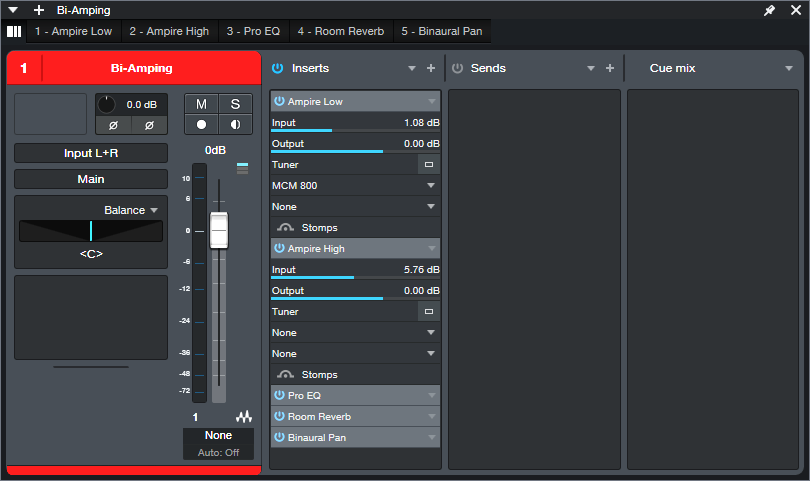
Figure 3: Originally, a frequency-based Splitter bi-amped two Ampires in parallel. Artist translated the chain into a series chain of effects that placed the two Ampires in series, without a way to bi-amp them.
In a case like this, when you send a song file, put as many of the series effects as you can in an FX Chain. In Artist, you would then use an input track and buses to split the audio (fig. 4).
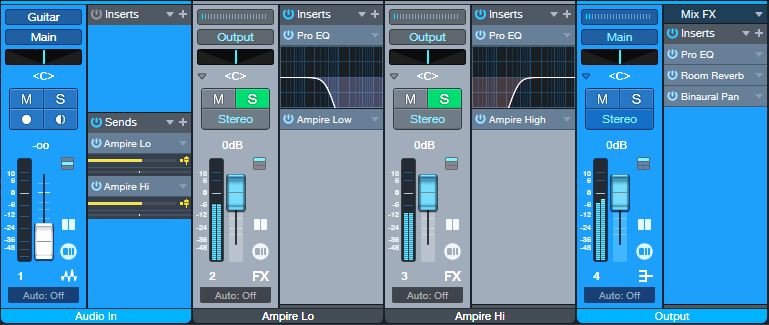
Figure 4: To replace frequency-split functionality, the Audio In channel splits the audio by sending it to two FX Channels. Each FX Channel has a Pro EQ3 to split based on frequency, which then feeds an Ampire. The Output channel includes the post-Ampire effects. You can save these as an FX Chain.
Even though the effect order changes in Artist, the effect parameter settings remain intact. If the user knows what the routing is supposed to be, simply create a track layout with the required tracks and buses, and drag the effects from the FX Chain that loaded in Artist to the additional tracks and buses. (This can get messy if there are several frequency splits, but it’s still doable with a stand-alone splitter plugin like TB Pro Audio’s ISOL8.)
FX Chain Backward Compatibility with Studio One Professional
Assuming the source and target programs have the same plugins used in the FX Chain, backward compatibility is rarely an issue.FX Chains created in Studio One 6 can load in versions 3, 4, and 5 (FX Chains didn’t exist before version 3). However, version 3 was before the Splitter was introduced. So, Studio One 3 Professional rearranges FX Chains with a Splitter into a series connection, the same way Artist does. You’d resolve the issue the same way you would in Artist. But seriously—if you’re collaborating with some who uses Studio One 3, gently suggest that they stop buying coffee at Starbucks for a while, and at least get Studio One 6 Artist.
Studio One Professional Track Preset Compatibility
Track Presets are exclusive to Studio One Professional. Also note that Track Presets were introduced in version 6, so as expected, they won’t load in previous versions.
When dealing with Studio One Artist users (or Professional users who haven’t installed version 6 yet), deconstruct any Track Preset you use into its components (similarly to fig. 4 above). Take a screenshot and send that to your collaborator.
Of Course, the Best Solution is Staying Updated
Given how many free updates there are between Studio One versions, there’s really no reason not to update. But sometimes, you’ll run into situations where for one reason or another, someone hasn’t updated their program or is using a different version—and now you have some solutions for carrying on with your collaboration.
Create Rhythmic Alchemy with the BeatCoder
By Craig Anderton
Over three years ago, I wrote a blog post on how to make a “drumcoder.” Its design was somewhat like a vocoder—drum audio served as a modulator for a carrier (e.g., a synth pad or guitar power chord). However, because the goal was not to process voice, the sound was warmer and more organic than traditional vocoding.
Unfortunately, the effect was super-complex to put together, and was practical only if you had Studio One Professional. But, no more: Dynamic EQ can take the concept to the next level. The BeatCoder is a much improved—and far simpler—version of the Drumcoder. Even better, it works with Studio One Artist and Professional. Let’s take a listen…
Fig. 1 shows one way to do BeatCoding.
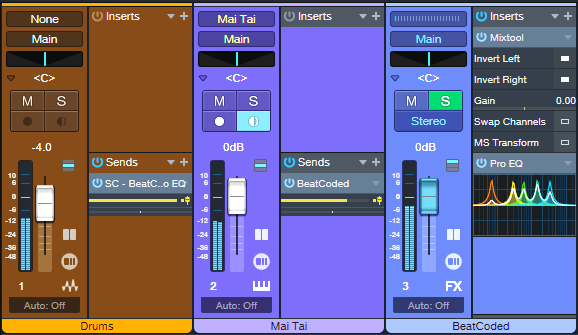
Figure 1: BeatCoder channel layout.
Let’s look at the Mai Tai “carrier” first. The Mai Tai track (or other sound of your choice) typically provides a sustained pad or similar sound. A Send goes to the BeatCoded FX Channel, which is in parallel with the Mai Tai and includes a Mixtool. The Mixtool inverts the left and right channels, so the BeatCoded track is out of phase with the Mai Tai. This causes the carrier sound to cancel.
The magic happens because of the Pro EQ3 in the BeatCoded track. The Drums track has a pre-fader send that feeds the Pro EQ3’s sidechain. By using the Pro EQ3’s Dynamic mode (fig. 2), the drum dynamics boost particular frequencies in the BeatCoded track in time with the beat. In the audio example, you’ll hear a drum loop driving the dynamic EQ as it processes a Mai Tai pad.
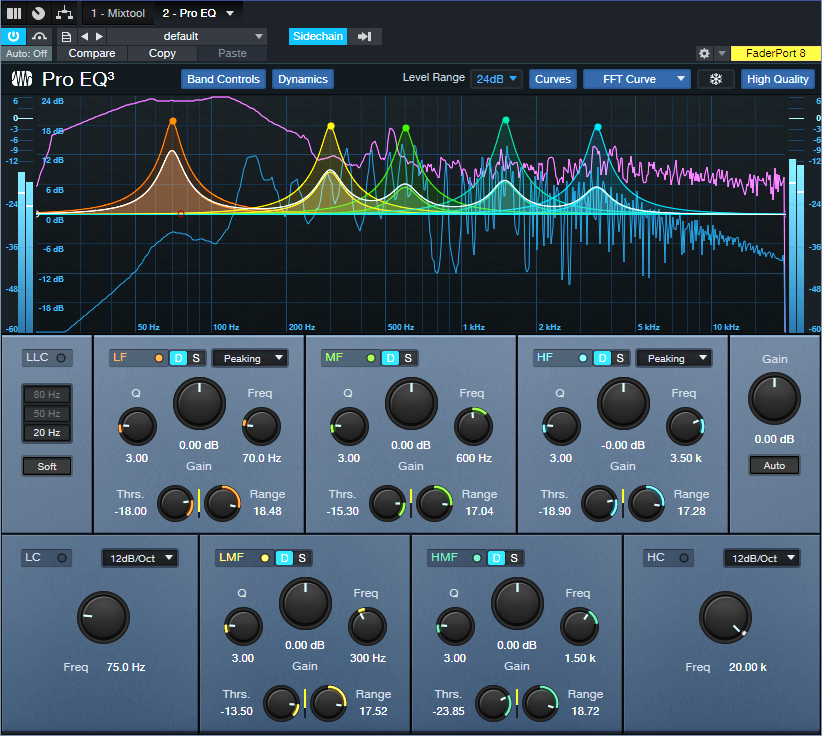
Figure 2: EQ settings used in the audio example.
Editing the Parameters
The editing possibilities are enormous:
- The EQ frequencies can cover various ranges. The Low and High Shelf EQs are in play as well as the Peaking filter type. You can even tune the EQ stages to different drums to have the synth sound respond super-tightly to the drum sounds.
- Higher Q settings are more dramatic, but can lead to overloads. Trim the synth/pad/power chord’s level if needed. You may also need to trim the Pro EQ3’s output level if the peaks distort.
- Each stage’s Range sets how much boost the EQs will receive from drum frequencies in the stage’s range. Threshold sets the level above which the drums affect the EQ.
- The Solo buttons for the various EQ stages help when getting to know this effect. They make it easy to set the Threshold and Range for a balanced response to dynamics (assuming that’s what you want).
- The pre-fader Send from the Drums track adjusts the amount of cancellation. Moving it off center lets through more of the synth sound. This is a very sensitive control, so it’s easy to miss where there’s maximum cancellation.
- Note that it’s not possible to have total cancellation, so that you hear only the effect of the EQ. EQs based on analog modeling have unavoidable phase shifts, which causes some leakage between the bands.
Other Implementations
The implementation shown above is simple and flexible, but it’s not the only one.
- You could create an FX Chain with the plugins from the BeatCoder track in fig. 1, insert the FX Chain in an Instrument track, and save the combination as an Instrument + FX preset. The Pro EQ3’s sidechain would still be accessible to an audio track with drums or a different audio source.
- The Pro EQ3 sidechain acts like a bus, because it can receive multiple inputs. So, if a drum module had individual outputs, particular drums could feed the sidechain selectively.
- The Range can also go negative, where the drums cut the response instead of boost it. This creates a more subtle effect, but can be useful in ambient and other forms of chill music.
Take the time to set this up, and play with it for a while. Warning: The results can be habit-forming.
Make Stereo Downmixes More Immersive
By Craig Anderton
One of Atmos’s coolest features is scalability. No matter how complex your Atmos project may be, you can render it as Binaural, 5.1, 5.1.2, 7.1, etc.—or even as conventional stereo.
As mentioned in a previous blog post, I now release Atmos Binaural and Stereo versions of my music on YouTube. However, although downmixing to stereo from Atmos retains the instrumental balance well, the frequency response seems a bit off compared to Atmos Binaural.
So, I used iZotope’s Tone Balance Control 2 to figure out what was happening. This analysis plugin is the result of dissecting thousands of master recordings. It shows a frequency response range within which different musical genres fall.
Fig. 1 shows the response curve of the downmixed stereo file derived from an Atmos mix. This is what most of my mixes look like before they’re mastered. Here. it pretty much skates down the middle of the “pop” curve.

Figure 1: Averaged frequency response curve of the stereo downmix.
Fig. 2 shows the averaged response curve of the Atmos Binaural mix. There are some obvious, and audible, differences.

Figure 2: The response curve of the Atmos Binaural render looks semi-mastered.
There’s a small bass bump, a dip in the midrange, and a slight boost in the “intelligibility” region around 2 to 3 kHz. Interestingly, these are like the EQ changes I apply when mastering.
Next, I created a Pro EQ3 curve that applied the same kind of EQ changes to the downmixed stereo file (fig. 3).
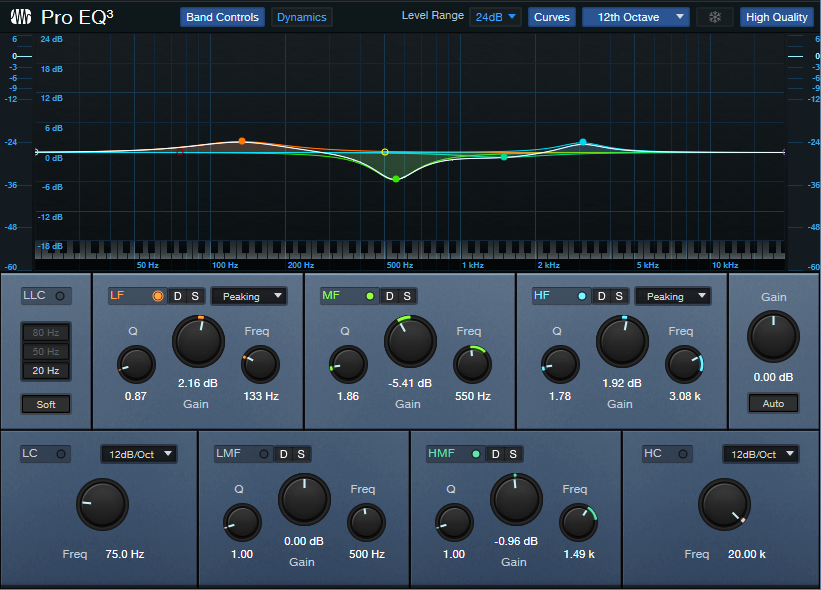
Figure 3: Pro EQ3 compensation curve for making the stereo downmix sound more like the Atmos Binaural mix.
Now the curve is much closer to the Atmos Binaural curve (fig. 4).

Figure 4: Averaged frequency response of the downmixed stereo file, after applying the compensation curve.
Does this mean that Atmos Binaural is tinkering with the sound? I don’t know. It may be a natural result of trying to translate an Atmos surround-based mix into Binaural audio. It may be a way to tweak the sound a bit to make it more consumer-friendly. That wouldn’t surprise me—most of what plays back music these days hypes the sound. The EQ difference isn’t huge, but it’s enough to give a slight perceived enhancement.
Let’s hear the difference. The audio example plays three 18 second samples of the same part of a song, all adjusted to around -12 LUFS using the Waves L3-16 multiband limiter. The first part is the stereo downmixed file. The second part is the Atmos Binaural file. The third part is the stereo downmixed file, but processed with the EQ compensation curve. Note that it sounds much closer to the Atmos Binaural version (although of course, without the spatial enhancements).
The audio example has drums, voice, guitars, bass, and synth. It’s a representative cross-section of what EQ affects the most in a mix. To my ears, the EQ-compensated downmix is an improvement over the unmastered downmix, and focuses the track a bit better.
So, the next time you want to downmix an Atmos mix to create stereo, consider the above when you want to minimize the difference between Atmos Binaural and stereo. Then, apply whatever other mastering you want to apply to both versions. You’ll end up with stereo mixes that may not have the depth of Atmos Binaural, but they’ll sound a lot closer.
Studio One: A Brief Exploration with Great Good Fine Okay
Watch the Brooklyn Synthpop duo remix their song “Blame” in Studio One
Less than 24 hours after meeting each other, producer Luke Moellman and vocalist Jon Sander had already written their first song together. On that fateful night in 2013, Moellman’s lush, retrofuturist production style collided with Sandler’s soulful falsetto to birth the soaring synthpop banger, “You’re The One For Me.”
Within a year, the duo had released a critically acclaimed EP and secured a major label record deal – an explosive combination that would take them to the top 10 of iTunes’ dance charts, with performances at Bonnarroo and SXSW, collaborations with St. Lucia and The Chainsmokers, and headlining tours of their own. Four albums and hundreds of shows later, the band is still hungry, and performing at the top of their game – as evidenced by the intoxicatingly disco-dipped, dance-inducing single “Blame” from their forthcoming EP.
Watch this episode to see how Great Good Fine Ok remix “Blame” with lush group vocals and richly-layered synths in Studio One.
In this Brief Exploration, Luke Moellman and Jon Sandler of Great Good Fine OK build a richly-layered remix of their song “Blame” using a dynamic range of instruments and effects from Studio One.
Luke begins the process by pulling in an assortment of drum loops as his starting point. “I initially got into Studio One because I was drawn in by the simple drag and drop workflow. It’s super quick to come up with ideas and elaborate on them. And I love the way it looks. It’s just so clean and simple.”
The new beat in place, Luke takes the basic chord idea and splits it up between several different synths to create new textures and tones. “I like doing those by hand because it can give you more interesting stuff than holding down notes on an arpeggiator. So I just record the MIDI, then quantize it, and pick the parts that I like.”
Luke is a big fan of Studio One’s “Retrospective Recording” feature, which allows him to jam freely over the top of the track while he’s auditioning new parts, then retroactively capture standout performances: “When I play the right thing, I can hit ‘retrospective recording’ and just grab it,” which takes the pressure off the performance and allows him to explore ideas without overwriting existing tracks.

With the rhythmic and melodic foundations in place, Luke brings vocalist Jon Sandler in for a series of soulful vocal takes. “The easiest way for me to get a stacked group vocal sound is to just do a loop record over whatever the section is, get as many takes as you want, and once you have all those, just right-click and then “unpack tracks to layers.’”
“Jon nailed those parts, but it’s pretty easy to just throw them all in Melodyne at once and do just like a little bit of touch-up to the group. Then once they’re bounced out into a stereo track, then you can just go to town with more effects: you can start chopping them up like that rhythmic editing we were doing.”
Any final words of wisdom? “Luke is really a brilliant producer, and it’s so cool to see how quick and creative his mind is and so it’s important to have a DAW that can keep up, and it seems like Studio One really does that better than all the others.”
PreSonus products used: Studio One, Melodyne
Try Studio One+ and check out the rest of our Brief Exploration series here.
Stamp Out Boring Flanging!
By Craig Anderton
The impetus behind this design was wanting to add envelope flanging to amp sims like Ampire. But there’s a problem: most amp sim outputs don’t create enough dynamics to provide decent envelope control. Well, that may be true in theory—in practice, though, Studio One has a few tricks up its sleeve.
How It Works
The Envelope Flanger is based on marrying a Track Preset with an FX Chain, and raising a family of Autofilters. Fig. 1 shows the FX Chain’s routing window.
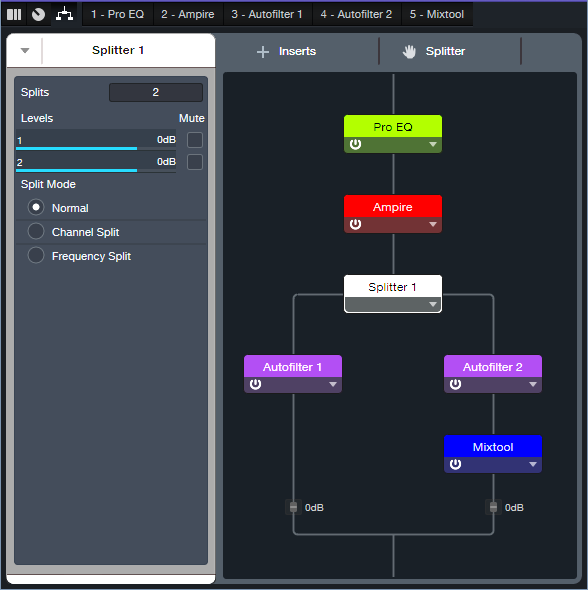
Figure 1: Flanger section for the envelope-controlled flanger.
The optional Pro EQ3 limits the high and low frequencies going into Ampire, which I feel gives a cleaner distortion sound. The Splitter feeds two Autofilters, which use the Comb filter configuration to create flanging. After all, the flanging effect creates a comb filter response, so we can return the favor and use comb filters to create a flanging effect.
To produce the “sucking,” negative-flanging sound, the two Autofilters need to be out of phase. So, the Mixtool Inverts the left and right channels for Autofilter 2.
The Track Preset
The reason for having a Track Preset (fig. 2) is because normally, the Autofilter responds to dynamics at its input. However, when preceded by an amp sim with distortion, there aren’t any significant dynamics. So, the Audio In track has two Sends. The upper Send in fig. 2 feeds audio to the FX Chain. The lower Send controls the sidechain of one of the AutoFilters. This allows the Autofilter to respond to the original audio’s full dynamics, rather than the restricted dynamics coming out of an amp sim.
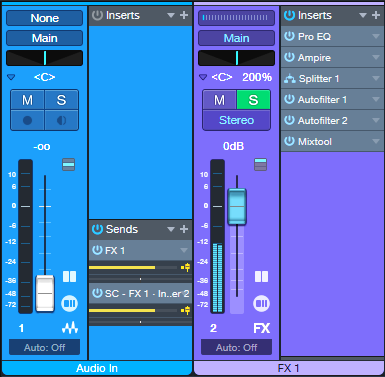
Figure 2: The Track Preset, which incorporates the FX Chain.
Editing the Autofilters
Like any envelope-controlled processor, it’s necessary to optimize the settings that respond to dynamics. In fig. 3, the crucial Autofilter controls are outlined in white. However, they also work in tandem with the Send from the Audio In track that feeds the Autofilter sidechain. Adjusting this Send’s level is crucial to matching the flanger response to your dynamics.
It’s unlikely you’ll have the sound you want “out of the box,” but be patient. As you’ll hear in the audio example, when matched with your dynamics, the envelope flanging effect will do what you want.
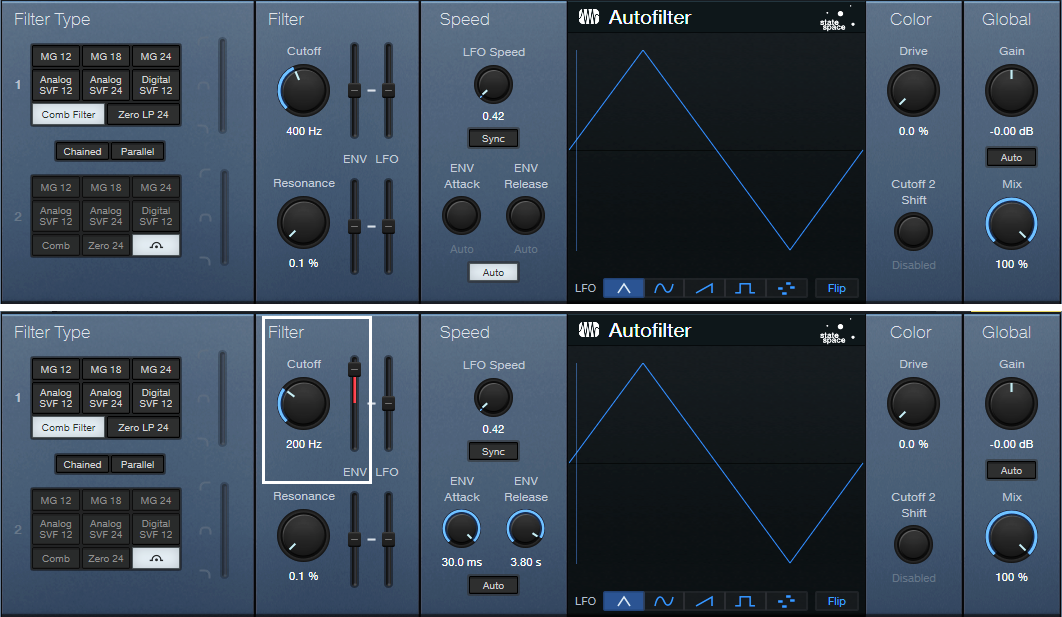
Figure 3: Initial Autofilter settings for Autofilter 1 (top) and Autofilter 2 (bottom).
Except for the Env slider in Autofilter 2, the Env and LFO sliders need to be at 0. To zero them, cmd/ctrl+click on the sliders. Depending on the Autofilter settings, the flanging envelope can either:
- Follow a string’s decay (positive-going response), where higher amplitudes raise the flanging pitch from the initial pitch.
- Follow a reverse decay (negative-going response), where higher amplitudes lower the flanging pitch.
- In either case, as the string decays, the flanging returns to its initial pitch.
For a positive-going response, start with the settings in fig. 3, but expect that you may need to change them. Set Autofilter 2’s Cutoff to a lower frequency than the Autofilter 1 Cutoff. Use positive Env modulation. Choose an Env modulation setting that reaches a high frequency, but doesn’t go so high that it starts cancelling on peaks consistently and sounds uneven. (However, some occasional cancellation gives the coveted “through-zero” flanging effect.) Vary the sidechain’s Send slider to optimize the response further.
For a negative-going response, change Autofilter 1’s filter Cutoff to 200 Hz. Fig. 4 shows Autofilter 2’s initial filter Cutoff setting, which should be just above where through-zero cancellation occurs after a string decays. But really, you don’t have to be too concerned about this. Play around with the two Cutoff controls, the Send fader, and Autofilter 2’s Env modulation amount…you’ll figure out how to get some cool sounds. Just remember that these controls interact, so optimization requires some tweaking.
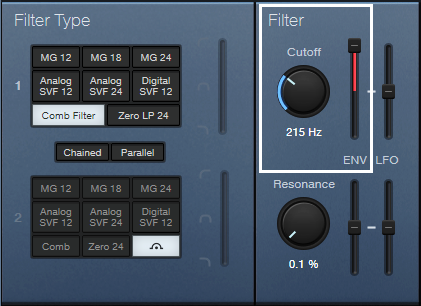
Figure 4: Autofilter 2’s settings that relate to negative-going flanging.
Here’s an audio example. The first half is positive-going envelope flanging, the second half is negative-going.
Download the Envelope Flanger.trackpreset here.
Creating Room Ambiance with Virtual Mics
By Craig Anderton
Supplementing close-miking techniques with room mics gives acoustic sounds a life-like sense of space. Typically, this technique involves placing two mics a moderate distance (e.g., 10 to 20 feet) from the sound source. The mics add short, discrete echoes to the sound being mixed.
This tip’s goal is to create virtual room mics that impart a room sound to electronic or electric instruments recorded direct, or to acoustic tracks that were recorded without room mics. Unlike a similar FX Chain-based tip from over six years ago, this Track Preset (see the download link at the end) takes advantage of a unique Track Preset feature that makes it easier to emulate the sound of multiple instruments being recorded in the same room.
The following trackpreset file will only work with Studio One Professional and Studio One+.
Using the Track Preset
Load the Track Preset Virtual Room Mics.trackpreset (Studio One+ and Professional only). After opening the Mixer view, in Small view you’ll see an audio track and four FX buses (fig. 1).
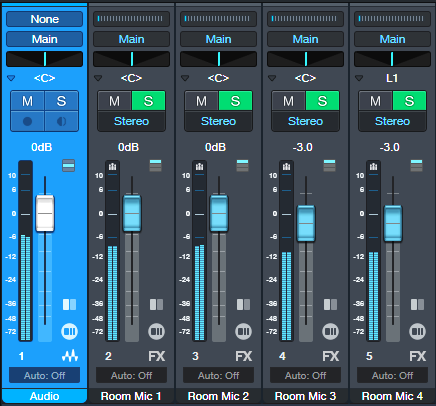
Figure 1: The Track Preset in the Mixer’s Small view.
The Track Preset includes a stereo audio track. This hosts the sound you want to process. Its four sends go to four FX Channels, each with an analog delay set for a different, short delay time (11, 13, 17, and 23 ms). These are prime numbers so that the delays don’t resonate easily with each other. The delayed sounds produce a result that’s similar to what room mics would produce.
The FX Channels are grouped together, so altering one Room Mic fader changes all the Room Mic faders. The levels are already offset a bit so that longer delays are at a slightly lower level. However, you can edit individual Room Mic faders by holding Opt/Alt while moving a fader. Note: Because the faders are grouped, you can simplify the Mixer view by hiding Room Mics 2, 3, and 4. Then, the remaining Room Mic 1 FX Channel controls the ambiance level.
Under the Hood
Fig. 2 shows the expanded Track Preset.
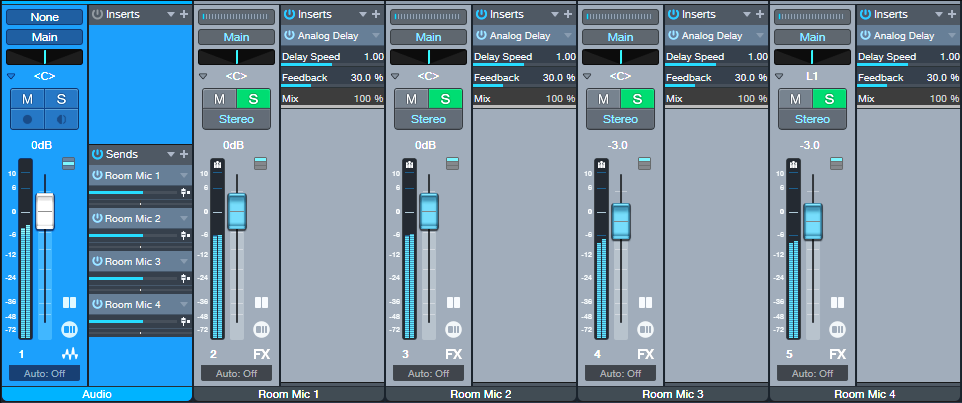
Figure 2: Expanded Track Preset view.
The Audio track has four post-fader sends. Each goes to its own virtual mic FX Channel with an Analog Delay. Aside from the delay times, they all use the settings shown in fig. 3.
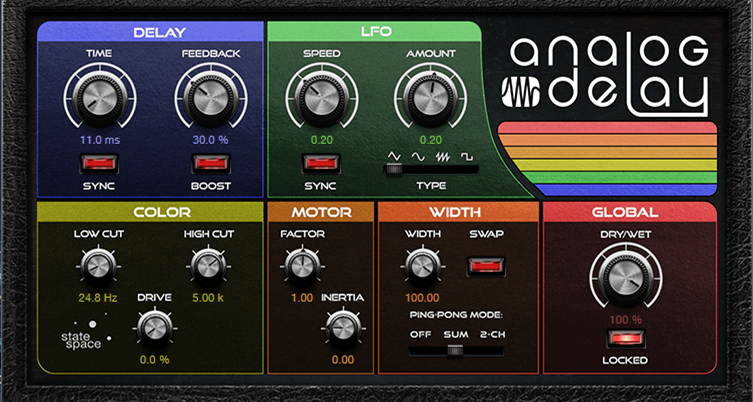
Figure 3: This shows the delay that’s set to 11 ms. The other delays are set identically, except for the delay time.
Using the Virtual Room Mics with More Than One Track
Loading another Virtual Room Mics.trackpreset does not load four more FX Buses. Instead, a new track appears, with its Sends already configured to feed the existing FX Buses. So, you can treat the Virtual Room Mics.trackpreset as a single room for multiple tracks.
Because new tracks appear with Sends already configured, you can vary the send levels slightly for different tracks to place the instruments in different parts of the room. For example, to move the instrument closer to the listener, turn down the sends going to room mics 3 and 4 (with the longest delays), and turn up the sends going to room mics 1 and 2 (with the shortest delays). To place the instrument further away, do the reverse. This more closely emulates recording multiple instruments in the same room. It’s a cool feature of Track Presets used in this type of application.
Workflow Tips
To hear what this FX Chain can do, load a mono Audioloop like Pop > Guitar > Dry > 01a Basement Jam E min. You’ll hear the guitar playing in a room, with a lifelike stereo image.
The main use for this Track Preset is when mixing a combination of acoustic instruments that are miked in a room, and electronic or electric instruments that are recorded direct. Adding room ambiance to the sounds that are recorded direct will let them blend better with the acoustic sounds. It’s best to insert this Track Preset early in the mixing process, so that your mix starts with a consistent acoustic space.
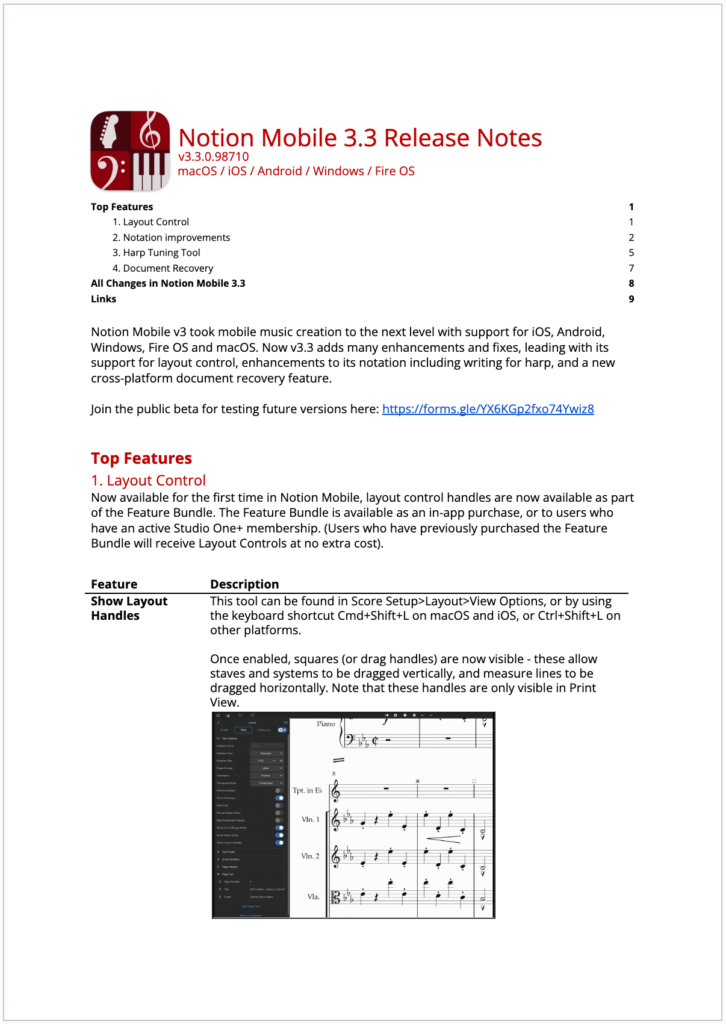
Notion Mobile 3.3 Now Available

Notion Mobile v3 took mobile music creation to the next level with support for iOS, Android, Windows, Fire OS and macOS. Now v3.3 adds many enhancements and fixes, leading with its support for layout control, enhancements to its notation including writing for harp, and a new cross-platform document recovery feature.
Notion Mobile is free, and all add-ons are included in a Studio One+ membership or available through the Feature Bundle in-app purchase. The update will automatically update on your device over time (if you have automatic updates switched on), or you can download it immediately from your preferred App Store by searching for ‘Notion Mobile’. More about Notion Mobile here, or click below for the full 3.3 guide.
Notion Mobile 3.3 New Feature Guide and Release Notes (click to open):
The Sweet Spot with Grammy-Nominated Producer 6ix

Logic’s Grammy-nominated producer breaks down his Sweet Spot.
Before he found success as an avant-garde hip hop producer, 6ix was just 30 units shy of a degree in neurology and physiology at the University of Maryland. But inches from the finish line and with “no plans of doing music career-wise,” 6ix’s life took an unexpected turn when he met Bobby Hall, aka Logic, at a beat battle.
“There would be these beat battles that I would do with my boy, Owen, and we ended up winning them all. I was like, ‘damn, there might be something here,’ and that’s when I met Logic.” From the outset, their creative connection was undeniable: “The first day I met him, he was like ‘you’re gonna be my producer.’ I remember dropping out of school, and then I moved to LA like 3 days later. I just stuck with my gut, and it worked out.”
In the 15 years since, the Grammy-nominated 6ix has gone on to produce 8 full-length records for Logic and has worked with Drake, 21 Savage, Khalid, Dizzy Wright, Sylvan LaCue, and more. “Being an Indian dude in this space, I wanna show people that it’s possible. That you don’t gotta follow the same route every time. Like, you don’t gotta be a doctor or engineer or whatever. It’s possible. Like, if I can do it, anybody can do it, really.”
Watch this episode to hear 6ix’s origin story and see how he uses the Eris Studio 5 Monitors and Sub 8BT Subwoofer to dial in his Sweet Spot.
In this episode of The Sweet Spot, 6ix talks about his origins, creative philosophy, and songwriting process.
“What really got me into music as a kid was probably my dad and my uncle,” he says. “There’s something about tapping into what I loved growing up that kind of relieves all pressure for me and I get back into that mindset of doing it for fun.” And for 6ix, a critical part of that mindset is keeping it simple: “I’m a big proponent for simplicity [because] it really lets the artist shine and lets the fans connect to what they’re really saying…Sometimes all it takes is a kick, snare, hat, a sample chop, or a dope piano or Rhodes part, and a bassline.”

When it comes to gear, the Eris 3.5 studio monitors and Sub 8BT subwoofer give 6ix the low-frequency foundation he needs for his bass-heavy beats: “Having good speakers is very important for me, especially for my low end. That’s why I like these Eris studio monitors so much. I just plugged them in straight up, and the levels were perfect. Everything is super accurate. I can hear the kick and I can hear the bass in two different spaces. I could mix full records on these speakers, just because everything is leveled and in place. I’m really impressed with how these sound.”
Any final words of wisdom? “I like the simple process. I’m at a point in my career where I’m having fun just making music that I wanna make at the crib, at the house. I feel comfortable here and I can just be my total self, and that’s my Sweet Spot.”
PreSonus products used: PreSonus Eris Studio 5 Monitors and Sub 8BT.
Check out the all-new family of Eris Studio Monitors and watch the rest of our Sweet Spot series here.