Studio One: Your Binaural Beats Lab
By Craig Anderton
When I heard about “binaural beats,” I was interested—I like beats, and I’m into binaural audio. But this has nothing to do with either one. Instead, it’s a sonic phenomenon that’s supposed to influence our mental state. Some think it’s woo-woo new age silliness, while others think it’s a largely unexplored area of psycho-acoustics.
I don’t know which is correct, so this tip is not a diss or endorsement of binaural beats. Instead, Studio One makes it easy to experiment with the concept, so you can decide for yourself if it has merit. Try it, and feel free to post your reactions in the comments below.
What We Do Know
Neurons in your brain create electrical signals that result in brain waves. EEG machines can measure their frequencies. Different frequencies occur during different mental states. For example, during deep sleep, the frequency range is 1-4 Hz. These are called Delta waves. Theta waves (4-8 Hz) occur with complete relaxation. Alpha waves (8-14 Hz) are associated with meditative/creative mental states, and Beta waves (12-30 Hz) happen when your mental gears are alert and turning.
With biofeedback training, it’s possible to recognize when you’re in various mental states. Eventually (the differences are very subtle), you can identify when you’re in a particular state, even without a biofeedback machine. But can you induce a particular state in your brain? This is where we leave science behind, and enter the anecdotal world of binaural beats.
What We Don’t Know
Binaural beats play back two different frequencies through headphones. They’re offset by frequencies that correspond to brainwaves. The claim is that by making the offset equal to specific brain wave frequencies, listening to binaural beats causes your brain to do “frequency following,” which helps induce a certain state. For example, if you want to go to sleep, you offset two frequencies by 1-4 Hz, like 100 Hz in one ear and 102 Hz in the other. Or if you want to go into an alpha state, the frequencies could be (for example) 110 Hz and 120 Hz.
There have been studies about using binaural beats for pain reduction, sleep disorders, and the like (search on “have there been any credible studies regarding the efficacy of binaural beats?). Some results have shown potential, some haven’t, and others are too influenced by bias. The jury’s still out on what conclusions we can draw.
Studies are always done with headphones that separate the two frequencies going into your ears. There are “binaural beats” videos on YouTube, but many of them are just a single sound that mixes waveforms from two frequencies. Others are true stereo. Perhaps not surprisingly, the comments for the various videos range from “hahahaha what morons” to “OMG, this solved my insomnia problem.”
Studio One Setup
It’s easy to check out this phenomenon for yourself (fig. 1).
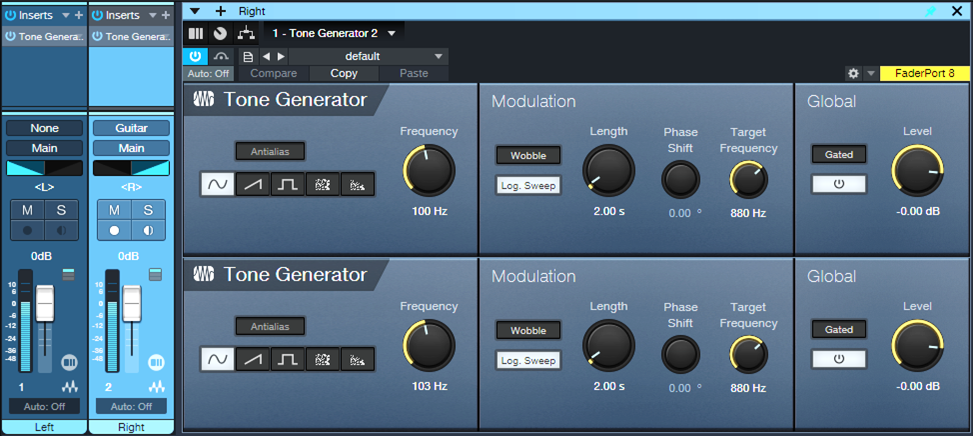
Figure 1: Channel and effects setup for experimenting with binaural beats.
1. Create two audio tracks. They can be mono or stereo.
2. Insert a Tone Generator in each channel. Choose the Sine waveform.
3. Pan one channel full left, and the other full right.
4. Offset their frequencies by the desired amount.
Using Binaural Beats
I don’t have a clue how to use this technique. I did see some studies that thought 10 minutes was about the optimum listening time. Others recommend much longer. It seems listening at a low volume is better (or at least less annoying, given that you’re listening to constant tones). I didn’t see anything that specified optimum frequencies for the tone generators, other than the offset amount. This is very much a DIY research project.
But does it work? Well, this is new to me, and I don’t know…so I’ll be interested to hear your thoughts.
The Pocket Queen | Take the Leap | Quantum Audio Interfaces
Professional drummer, producer, and New Orleans native talks about taking the leap.

A life in music requires passion, creativity, and dedication – and for many creators, their trajectory can be traced back to a defining moment that changed everything: the moment they took the leap.
Taylor Gordon, aka The Pocket Queen, is an American drummer and producer born and raised in New Orleans. The rising star has a flourishing fanbase on Instagram, and her uniquely groove-oriented fusion of jazz, funk, and pop has seen her perform with some of the biggest stars in music (Beyonce, Stevie Wonder, Willow, Michelle Williams, Robert Glasper, and more).
Watch as Taylor performs her new instrumental track “Cloud 9” through the all-new PreSonus Quantum HD 8 audio interface, and shares her story of New Orleans roots, attending the Berklee College of Music, and taking a leap of faith to pursue music professionally in Los Angeles.
Though she currently resides in Los Angeles, Taylor isn’t shy when it comes to talking about her hometown: “I don’t claim to be from any other city I’ve lived but my birthplace: New Orleans, Louisiana. I don’t go home often, but whenever I do, I get a better understanding of myself. It’s like I pick up wherever I left off. My accent starts to come back a little. I look around and the people look like me, act like me.”
Founded on the banks of the Mississippi River more than 300 years ago, New Orleans is a city rich in history and existing in a near-constant state of flux. “A lot of restaurants and places I used to go are no longer there: Destroyed by Katrina, or went out of business. Chefs left, recipes changed. Even my childhood schools are gone and the neighborhoods are still in ruins. So I try my best to hold on to the memories. The Southern hospitality and culture. I take them with me wherever I go.”
Despite her current and burgeoning success, Taylor’s came from very humble beginnings: “I’m from this music city, but I grew up very sheltered. So I found my groundings in church. The choir director and his son were incredible drummers and I would sit there and watch him in awe every week. Becoming a drummer seemed like this daunting, impossible, unattainable thing.” But Taylor saw herself being able to attain that level in her own way, and it inspired her to find her own voice: “One day I took a leap of faith, mustered up the nerve to play for a church service. That’s where I found my footing and learned that music is about serving something greater than myself.”

Emboldened by her experiences, Taylor took another leap of faith and applied to Berklee College of Music where she studied new genres, gained live performance experience, and learned how to produce, compose, and program music. Then, In July 2013, she took the ultimate leap and bought a one way ticket to Los Angeles, California. “I had no job offers; I didn’t even have a drum kit; I just knew that God promised he would take care of me if I took a leap of faith. So I did.”
The last decade has seen Taylor’s career blossom with an ever-expanding roster of increasingly high-profile performances even as she continues to produce her own music – and all of this success is ultimately derived from her love of drumming: “For me, ‘pocket’ is more about the spaces of silence between the notes. It’s about being in the right place at the right time. And that philosophy applies to my life, and my music. There have been a lot of leaps, detours and dead ends, and there will probably be more on this journey – but while the route may change, the destination stays the same.”
PreSonus products used: PreSonus Quantum HD 8 USB-C Audio Interface.
Meet the all-new family of Quantum USB-C Recording Audio Interfaces, and get in-depth information about the entire product line here.
Introducing the All-New Quantum Audio Interfaces
Take the Leap with the Next Generation of PreSonus Audio Interfaces
MEET THE ALL-NEW FAMILY OF QUANTUM AUDIO INTERFACES
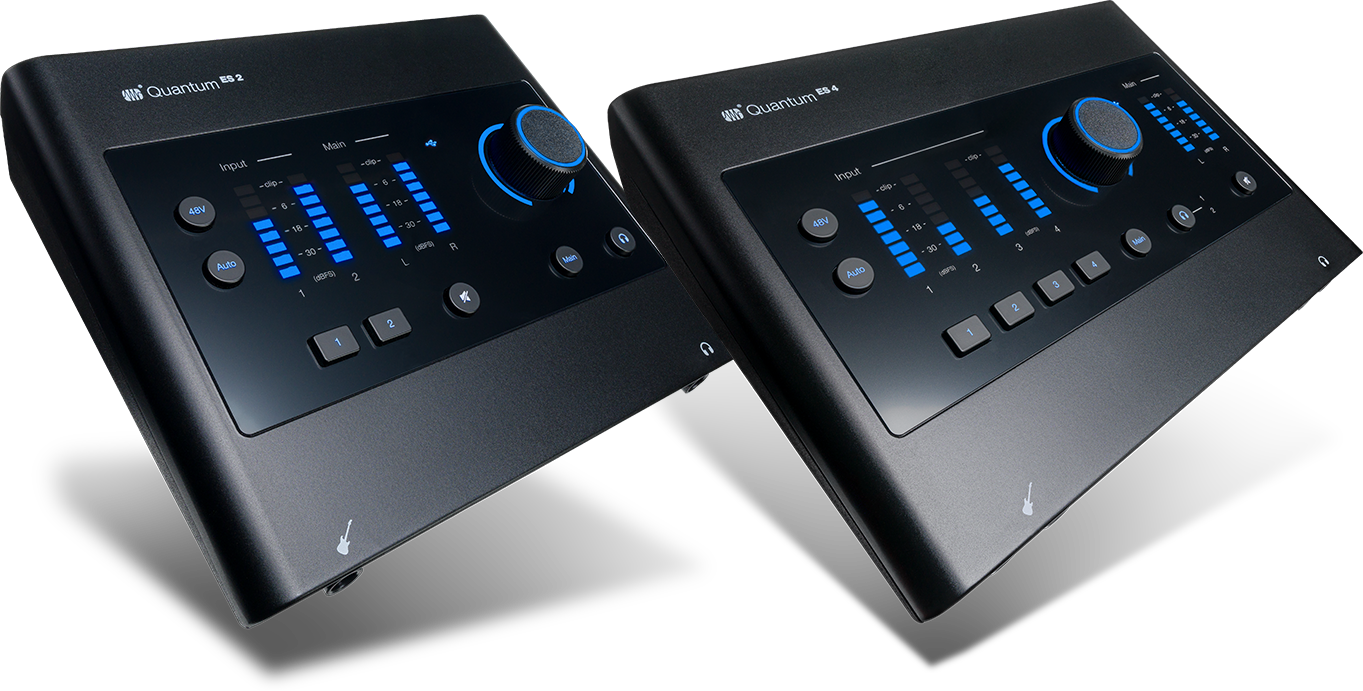
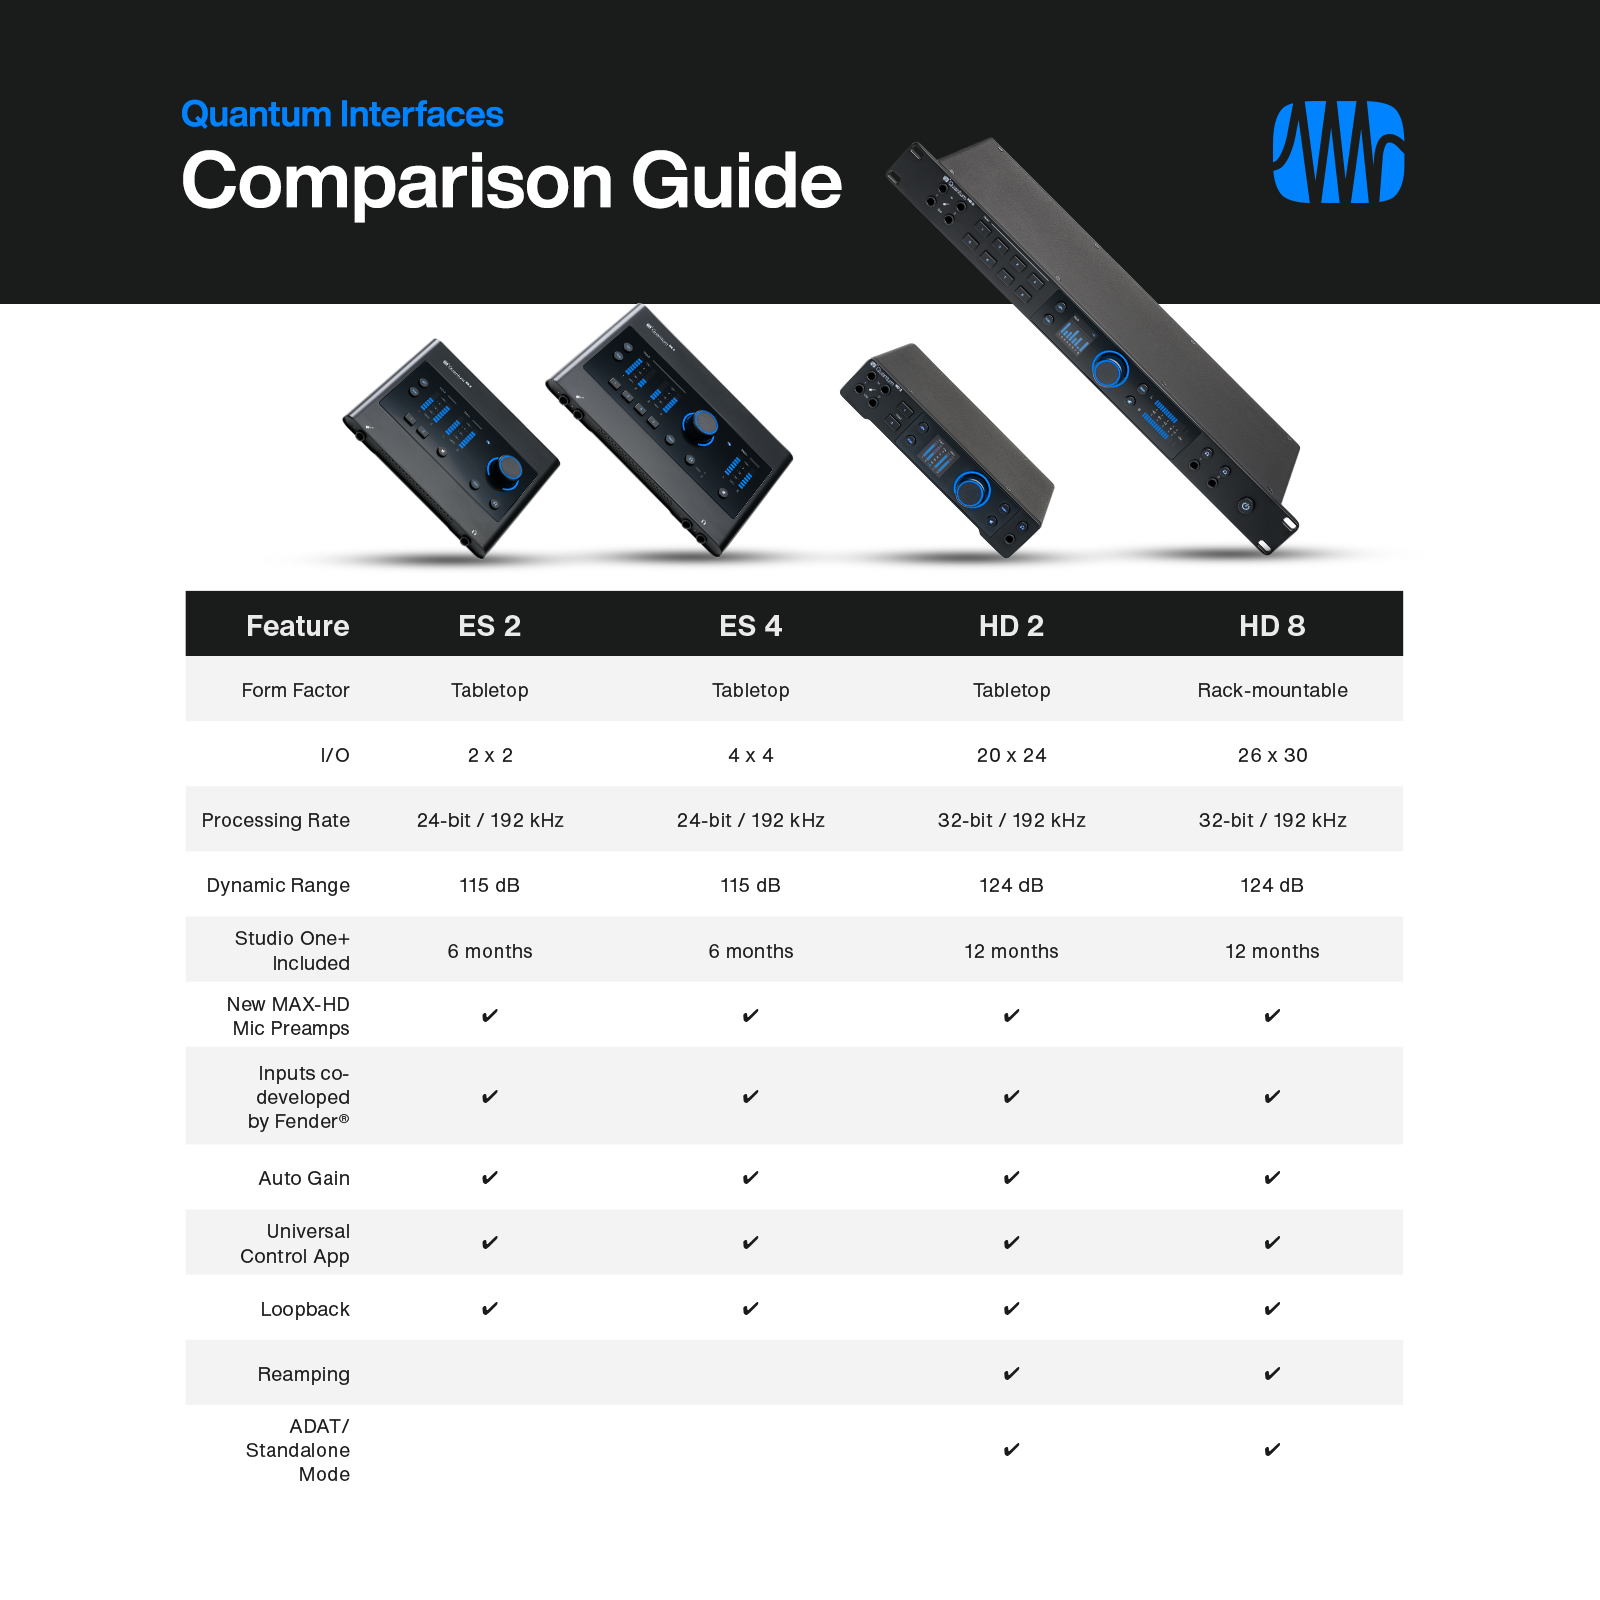
The culmination of nearly 30 years of PreSonus expertise, Quantum delivers newly-redesigned MAX-HD preamps, class-leading converters, front-facing instrument inputs co-developed with industry-leading experts at Fender®, and stunning, high-fidelity performance for self-made audio creators and professional studio sessions. Sleek, stylish, and packed with premium features, these USB-C audio interfaces are available in four distinct models: Quantum ES 2, ES 4, HD 2, and HD 8.

ES SERIES
The Quantum ES 2 and ES 4 models are powerful, compact audio interfaces that deliver pristine preamps and class-leading converters in an intuitive and accessible design – making them the perfect interface for self-made audio creators capturing their creativity at home, or on the go.
Quantum ES interfaces deliver high-quality 24-bit converters, new MAX-HD mic preamps with +75 dB of gain for transparency and accuracy across the frequency range, 115 dB dynamic range, Auto Gain, inputs co-developed by Fender, loopback, and 6 months of Studio One+ in an intuitive and compact design.
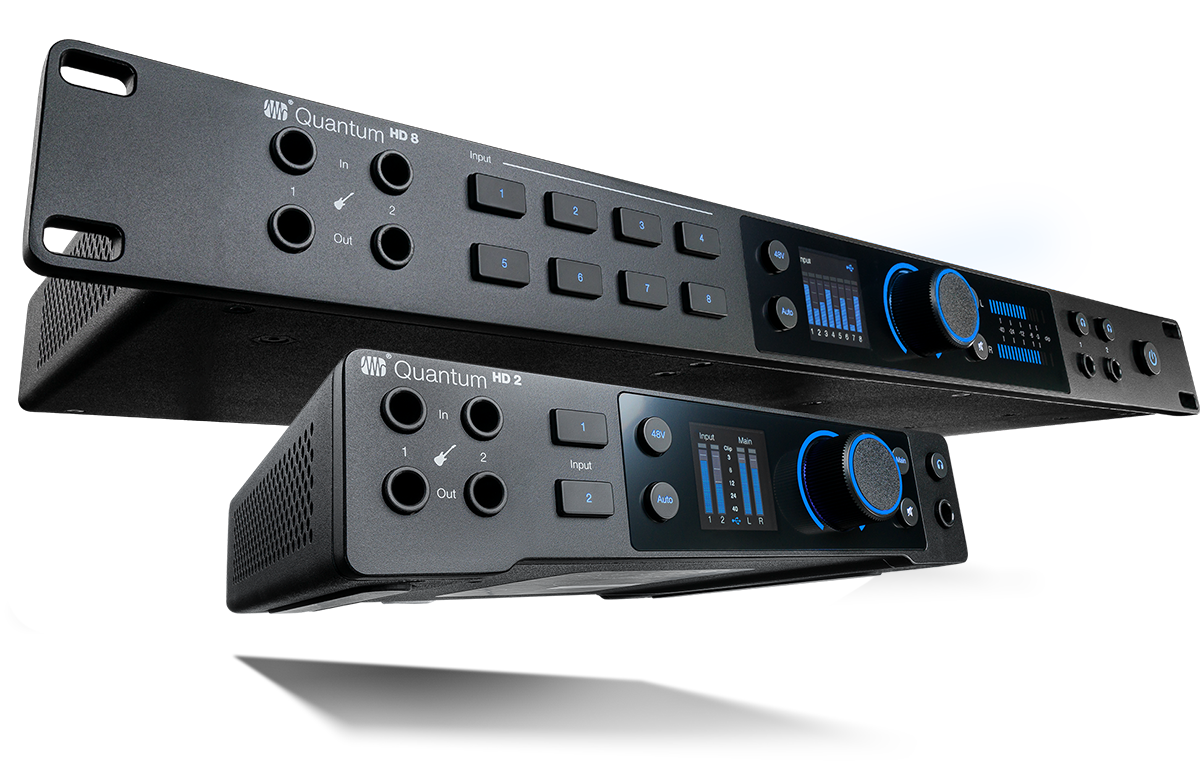
HD SERIES
The tabletop Quantum HD 2 and rack-mountable HD 8 audio interfaces empower creators with high-quality audio production, newly-redesigned MAX-HD preamps, class-leading converters, and instrument inputs co-developed with industry-leading experts at Fender®.
Quantum HD interfaces deliver premium performance and high-fidelity features in powerful tabletop and rack-mountable forms. Boasting high-quality 32-bit converters, extensive I/O, and seamless access to Studio One for professional studio sessions, the HD series features ADAT/standalone mode and two dedicated re-amp outputs that you can use to send a dry pre-recorded guitar signal out to an external amplifier for further processing and recording – plus 12 months of Studio One+ Hybrid.
COMPARISON GUIDE
Not sure how to choose the right interface for you? Use our handy comparison guide to find the best audio interface for all your recording needs.
Groove Hacking with Multiband Gating
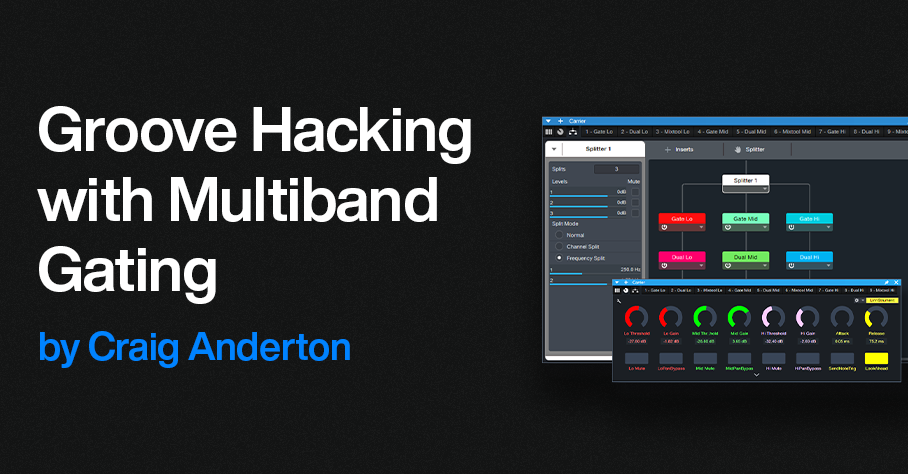
by Craig Anderton
About four years ago, I did a tip on multiband gating. Although it was a cool effect, it was guitar-centric, cumbersome to edit, and time-consuming to put together. But that was before Track Presets—this improved version requires only a single Track Preset, and works well with synths, guitars, and other instruments. Furthermore, a Macro Controls panel provides flexible, versatile editing. (There’s a download link at the end, along with an audio example.)
The overall design is somewhat like a vocoder. It uses a Modulator to generate control signals, and these process a Carrier. The mixer channel layout in fig. 1 may look daunting, but loading the Track Preset does almost all the work for you.
Setup
1. Load the Groove Hacking Track Preset.
2. Open the Mix view. When you load the Track Preset, the Output assignments for the Modulator’s Lo, Mid, and Hi FX Channels default to Main.
3. Assign these outputs (circled in orange in fig. 1) to the sidechains in the Carrier’s Gates:
- Assign the Lo band output to the Carrier’s Lo Gate sidechain.
- Assign the Mid band output to the Carrier’s Mid Gate sidechain.
- Assign the Hi band output to the Carrier’s Hi Gate sidechain.

Figure 1: The blue channels are the Carrier, the violet channels are the Modulator. The Modulator bus outputs with the orange outline have been assigned to Gate sidechains in the Carrier.
4. Choose audio for the Audio In and Modulator tracks, and you’re ready to do some groove hacking. To get a feel for how this works, try a synth pad or power chord for the Carrier, and a drum loop for the Modulator.
5. The Macro Controls panel’s default settings will likely not work well with the Audio In and Modulator tracks you’re using, because the Groove Hacking effect is sensitive to levels. So, once you have the setup in place, use the Macro Controls panel to optimize the effect.
How to Use the Carrier Bus Macro Controls
Fig. 2 shows the Macro Controls for the Carrier’s FX Chain.
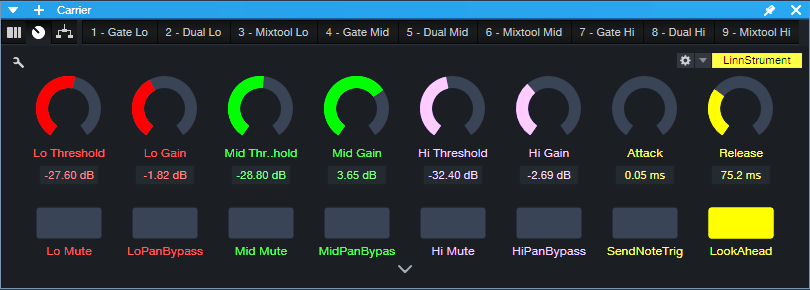
Figure 2: Controls that relate to a specific Gate have the same color. The yellow macro controls, and the LookAhead and Send Note Trig buttons, are global.
The following are per-band Gate controls:
- Threshold edits the triggering characteristics for each Gate (Lo, Mid, and Hi bands). If turned up too high, triggering won’t happen and you’ll hear no sound. If turned down too low, the sound will be on almost all the time instead of following the modulator’s rhythm.
- Gain adjusts the output level for each Gate. Use these controls to achieve the best balance among the three frequency bands.
- Mute turns off individual bands. When choosing the optimum Threshold for one band, it’s convenient to mute the other bands.
- Pan Bypass. The Lo, Mid, and Hi bands have default pan positions of center, left, and right respectively. Turn on the Pan Bypass button to center a band in the stereo field.
The following are global controls:
- Attack edits the time for the triggered sound to ramp up to its full level. Turning this up can give short “swell” effects.
- Release is important, because it determines the percussive character of the triggered sounds.
- For advanced applications beyond the scope of this tip, enabling Send Note Trig exposes the Gate note trigger outputs as MIDI inputs for Instrument tracks. Every time a Gate opens, it sends a MIDI note trigger. For example, you might want to trigger a kick drum sound every time the Lo Gate opens. The triggers default to Note C3 with a Velocity of 100. To modify the note pitch and velocity, open the FX Chain, and open the Gate whose note you want to edit.
- Leave LookAhead on. Turning it off reduces latency by 2 ms, but the tradeoff is less precise triggering.
Under the Hood: How It Works
The Carrier Section (blue channels in fig. 1) has an Audio Input channel and a bus. The Audio Input’s pre-fader Send feeds audio to the Carrier bus. The bus splits the audio into three bands, followed by gates. Triggering the gates from control signals generated by the Modulator Section (violet channels in fig. 1) processes the Carrier audio.
The Modulator Section derives the control signals:
- The Modulator audio’s channel has three pre-fader sends that feed three FX Channels.
- Each send goes to its own FX Channel.
- Each FX Channel has a Pro EQ3 that isolates a particular frequency band.
- Each FX Channel Output provides a control signal to the sidechains of the Carrier’s Gates. These control signals open and close the Gates.
The Carrier Section processes the audio it receives from the Audio In track’s pre-fader Send with the Carrier’s Extended FX Chain. Fig. 3 shows the FX Chain’s Routing Window. The splits are frequency-based, with split points at 250 Hz and 1.50 kHz. Each band goes to a series connection of a Gate, Dual Pan, and Mixtool.

Figure 3: Incoming Carrier audio feeds a frequency-based Splitter, which splits into three bands. Each of the three bands goes to a dedicated Gate, Dual Pan, and Mixtool.
Optimizing the Frequency Splits
You may need to optimize the Carrier’s Splitter frequencies, as well as the Modulator’s EQ frequencies, for the audio you want to process. In most cases, the Carrier’s Splitter bands and Modular EQ bands should be the same, and the Modulator’s frequency bands shouldn’t overlap. To do this:
- Set the Modulator’s Lo band Pro EQ3’s HC Freq to the same frequency as the Mid band Pro EQ3’s LC Freq. This is also the same frequency as the Splitter’s low frequency split.
- Set the Hi band Pro EQ3’s LC Freq to the same frequency as the Mid band Pro EQ3’s HC Freq. This is also the same frequency as the Splitter’s high frequency split.
The stages mentioned above are the only ones used in the Pro EQ3 processors. For the best separation between the bands, choose a 24 dB/octave slope. However, there are no rules! The bands can overlap, have different slopes, use a peak response for some bands, or whatever sounds best.
How to GetTips for Getting the Most Out of This Tip
- Groove Hacking pairs well with virtual instruments, especially pads. Replace the Audio In track with an Instrument track. Insert a pre-fader send in the Instrument track, and assign it to the Carrier bus.
- Adjusting the Threshold Macro Control for each band is crucial. Mute the bands whose Threshold you’re not adjusting. For further editing, the Lo, Mid, and Hi FX Channel faders can fine-tune the audio going to the Gate’s sidechain. If a band’s Gate Threshold can’t be turned down or up far enough, reduce or raise the level of its corresponding FX Channel fader respectively. Automating these faders and varying their levels can add even more variety to the sound.
- The Carrier’s pre-fader send allows for flexible mixing. With the Carrier’s channel fader down, the Audio In or Instrument track’s pre-fader send sets the mix of the Carrier in the final output. Turning up the Carrier’s channel fader mixes in the original signal feeding the Audio In (or the sound of a virtual instrument from an Instrument track).
- To mix in some of the raw Modulator sound, turn up its Channel fader.
- The Carrier bus can receive sends from multiple Channels, not just the Audio In. So, you can process multiple channels simultaneously.
- To vary the stereo placement and width of the three Carrier band’s outputs, open the FX Chain and alter the Dual Pan settings.
- Experiment with this tip early in the mixing process. You may find you don’t need as much instrumentation when one of them is blurring the line between melody and rhythm.
In the audio example, the Modulator is a drum loop from the MVP Loops – Afro Pop loop library. The Carrier is a Mai Tai preset. In the second half, a bit of the dry modulator sound fades in.
Download the Groove Hacking Track Preset here!
The Real-Time 6-to-12-String Guitar Converter
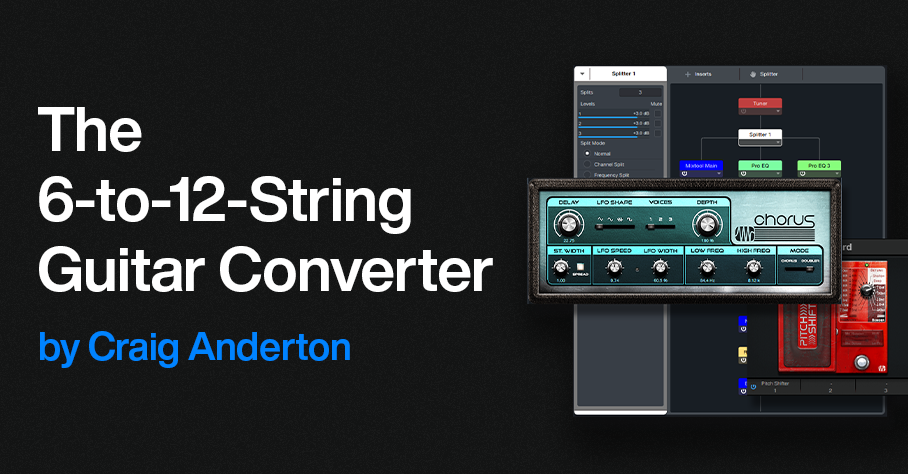
By Craig Anderton
With this technique, when you play a standard 6-string electric guitar, you’ll hear the rich, vibrant sound of a 12-string guitar. The proof is in the listening: The audio example’s first part features the raw 6-string guitar sound. The second part showcases the transformative nature of this tip’s approach.
How It Works
The guitar’s audio splits into three paths:
- The Main path is the straight guitar sound, with no processing.
- The Octave path uses a pitch shifter to transpose the audio up 12 semitones. This produces the sound of the octave-higher strings. However, a physical 12-string doesn’t double the top two strings, so they don’t create an octave effect. To reduce the octave-higher component in the higher notes, High Cut filters reduce high frequencies going into and coming out of the pitch-shifter plugin.
- The Chorus path emulates the doubling of a 12-string’s top two strings. In addition to using the Chorus in Doubler mode, a low-cut filter reduces the chorusing effect in the lower notes. This ensures that the effect is most prominent with the higher notes.
Although an Extended FX Chain is the most convenient implementation (there’s a download link at the end), Studio One Artist can use buses and sends to create this effect. In either case, when editing the three paths’ levels, set the Main path’s level first. Then, bring up enough of the Octave channel to create the 12-string effect on the lower strings. Finally, bring up the Chorus path to fill out the sound.
Choosing a Pitch Shifter
Fig. 1 shows two pitch shifting options. The Pitch Shifter in the Ampire High Density pack has low latency, which is why it can do real-time “whammy” effects. The Pitch Shifter plugin from Kilohearts.com (free when you create an account on their website) is also well-suited for this application. The downloadable FX Chain uses it, for the benefit of those who don’t have the High Density pack. The plugin introduces some latency. However, this is a feature, not a bug. With a physical 12-string, you hit the octave string slightly later than the fundamental one. Coincidentally, the latency gives this effect. The plugin is basic—all it does is shift pitch. So, the fidelity is quite good for a real-time processor.
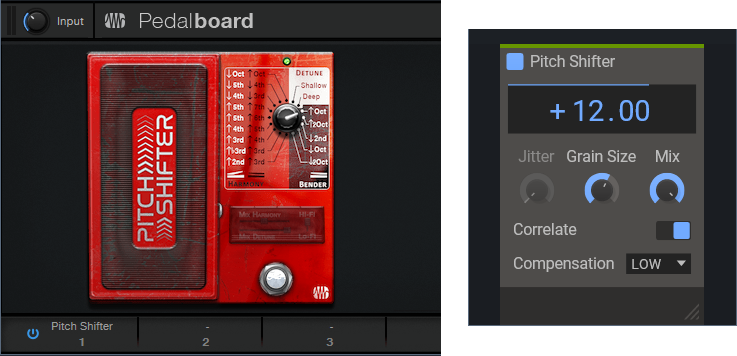
Figure 1: Two pitch shifter options. (left) PreSonus Pedalboard Pitch Shifter. (right) Kilohearts Pitch Shifter.
To use the High Density Pitch Shifter, insert a Pedalboard in place of the Kilohearts Pitch Shifter. Load the Pitch Shifter plugin into the Pedalboard, transpose the Pitch Shifter up an octave, and follow it with a 20 ms delay (delayed sound only).
Option 1: Artist Implementation
Fig. 2 shows the implementation for Studio One Artist. The Main guitar path has two sends, one to the Octave path and one to the Chorus path. All three paths assign their outputs to the Output channel. Its fader provides a master volume control for the three paths. So, once you’ve set your levels as desired , you can hide the Main, Octave, and Chorus paths to save space in the console.
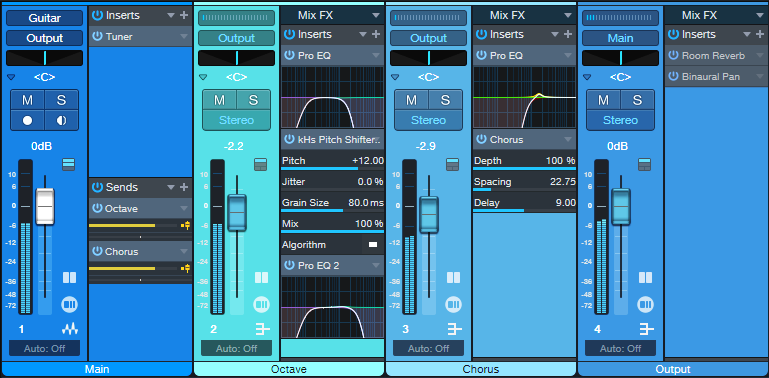
Figure 2: Configuration for Studio One Artist.
Fig. 3 shows the control settings for the three Pro EQ3 processors. Their other controls aren’t shown because they’re not used. Use these EQ settings regardless of which pitch shifter plugin you choose.
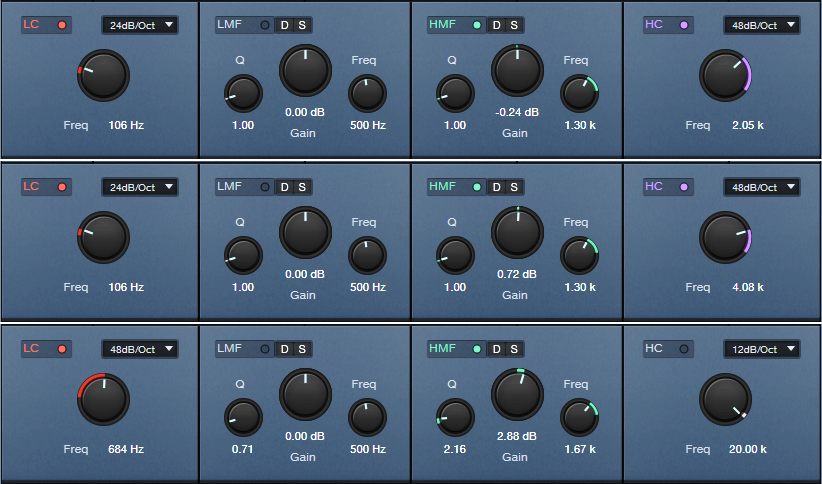
Figure 3: EQ settings. (Top) Pre-Pitch Shifter EQ. (Middle) Post-Pitch Shifter EQ. (Bottom) Pre-Chorus EQ.
Fig. 4 shows my preferred Chorus settings.
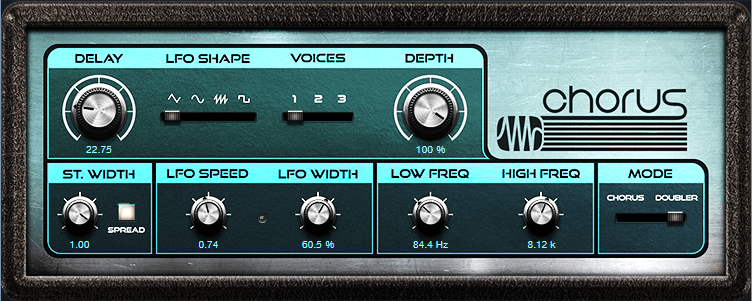
Figure 4: Chorus settings for the Chorus path.
The Output channel incorporates optional Room Reverb and Binaural Pan plugins.
When setting levels for the three paths, start by turning down their levels. Set the Main path level first. Then, bring up enough of the Octave channel to create the 12-string effect on the lower strings. Finally, turn up the Chorus path to fill out the sound.
Option 2: Extended FX Chain (Studio One+ and Professional)
Fig. 5’s Extended FX Chain incorporates the plugins shown in fig. 2, as well as Mixtools for each internal path. These link to the Macro Controls, which control the path levels.
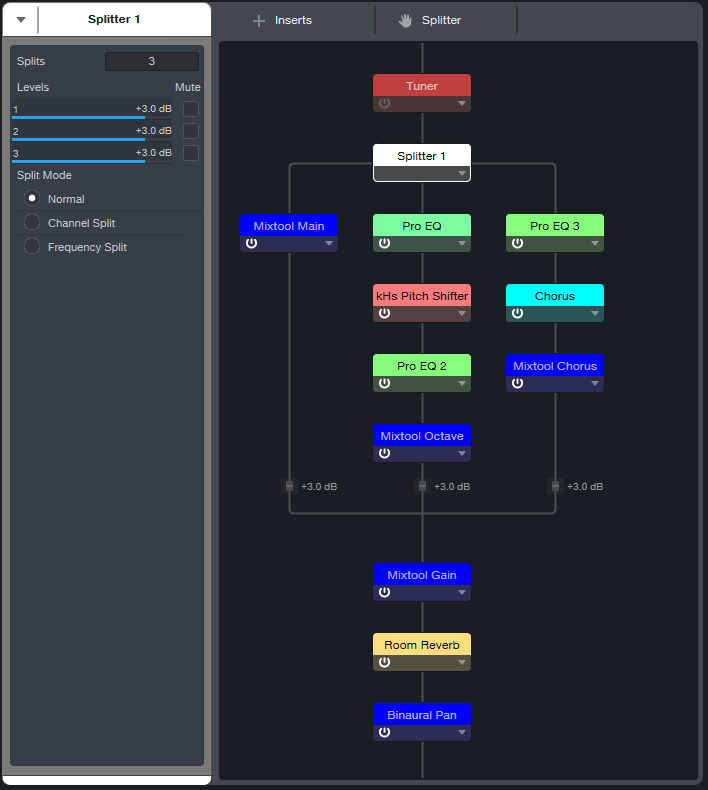
Figure 5: Extended FX Chain plugins.
Fig. 6 shows the Macro Controls panel.
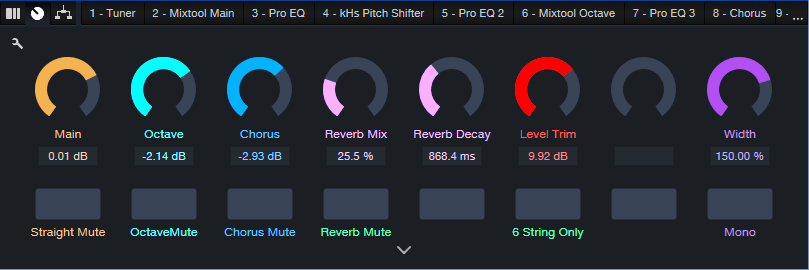
Figure 6: The Macro Controls panel provides flexible, hands-on control for the 6-to-12-string converter.
The controls do the following:
- Main, Octave, and Chorus are level controls for the three paths. Each path has a corresponding Mute button.
- Reverb Mix controls the Room Reverb Global dry/wet balance.
- Reverb Decay alters the Room Reverb Length parameter.
- Reverb Mute bypasses the reverb effect.
- Level Trim balances the level of the 6-to-12 string FX Chain effect to the non-processed track when the 12-string effect is bypassed.
- 6 String Only mutes the Octave and Chorus paths, but leaves the Main path and Room Reverb active.
- Width controls the Binaural Pan effect.
- Mono defeats the Binaural Pan’s widening effect. It’s useful to assign to a footswitch. Then, you can switch instantly between the wide stereo sound, and the tight mono sound.
Not only is the sound rich and convincing—you don’t have to tune 12 strings! Download the 6 to 12 String Converter.multipreset here.
Impact XT’s Secret Clip-Launching Talents
By Craig Anderton
Impact XT can launch clips, which is great for songwriting (see the blog post Songwriting with Impact XT). But few people realize that Impact XT can also launch scenes that trigger multiple clips simultaneously. You can even trigger and play back multiple scenes at the same time.
Although the functionality isn’t as deep as programs with dedicated clip launching, Impact XT offers features that other programs don’t have. So, this tip is uniquely suited to a variety of improvisational and compositional techniques.
Here’s a download link for CA Scene Launch Tip.song, a basic scene launching template for Studio One version 6.X. This will make it easy for you to become familiar with the process of launching scenes using Impact XT. Please note that this tip is compatible with Studio One Professional and Studio One+, but not Studio One Artist.
What Are Clip Launch Scenes?
Scenes trigger multiple clips. For example, one scene might launch a mixed drum loop, percussion loop, and bass line loop. A different scene could trigger the same clips, but add a rhythmic synth or guitar part. Another scene may be similar, but switch out the drum loop and bass line for different drum and bass loops. Choosing different scenes lets you build a set, or improvise a song structure in real time. You can also record your live improvisations. It’s a lot of fun, as well as inspirational.
The Clip Launch Scene Solution
The solution is using Chorder to trigger multiple Impact XT pads from a single keyboard key. This tip covers a way to launch four loops simultaneously per scene, with up to 7 different scenes. However, the principle is expandable for more complex clip launching (e.g., trigger more scenes, or more loops in each scene). Even better, this approach can play back several scenes simultaneously. As far as I know, no other program with a clip launcher can do this.
Getting Started
Suppose you want to be able to call up seven different loop combinations, building from simpler to more complex loop combinations. Start with kick and hi-hats. Then, trigger another scene that adds percussion, so triggering both scenes builds on the first scene. Different scenes could have different bass lines, synth pads, or whatever. So, you can build “loop orchestrations” in real time.
For my particular application, all the pads had the same triggering characteristics (fig. 1). Of course, you could instead have scenes whose pads have One Shot, Normal, or Toggle responses.
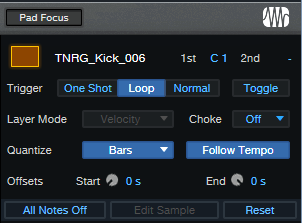
Figure 1: Initial pad setup. Loop and Follow Tempo are enabled, with Quantize set to Bars.
Pads, Meet Chorder
Next, assign the Impact XT pads to note triggers (fig. 2). Then, create a Chorder Note FX preset.
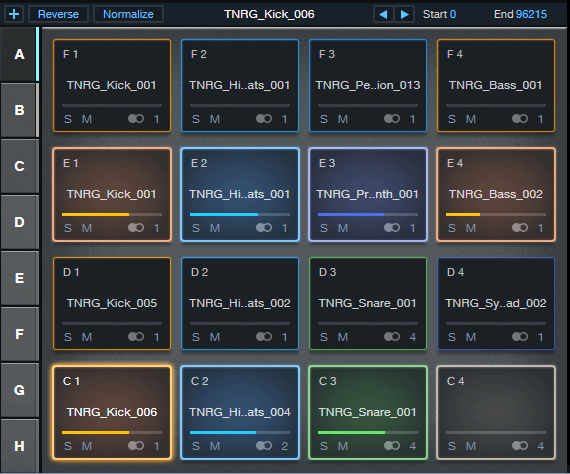
Figure 2: The trigger pad note assignments work in conjunction with Chorder. Note that two scenes are playing back at the same time.
I wanted to use only white keys as triggers, to keep the process simple for live improvisation. The bottom Impact XT row assigns pads to C1, C2, C3, and C4. The next row up assigns pads to D1, D2, D3, and D4. Each successive row assigns pads to the next higher note octaves on a keyboard, up to B1, B2, B3, and B4.
Chorder is programmed so that when you play a note on the keyboard, it plays notes on the octaves that trigger the clips in a scene (fig. 3).
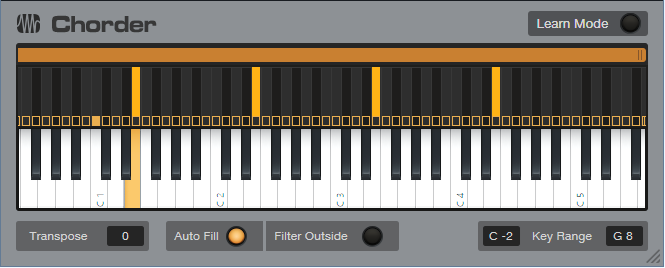
Figure 3: Playing E on a MIDI keyboard sends triggers on E1, E2, E3, and E4. This triggers four clips in a single row of pads.
Now we have a basic setup for triggering scenes from keyboard keys. An octave of white keys (C1 to B1) triggers 7 scenes. Including black keys could trigger 12 scenes from an octave of keyboard keys.
Going Further
This technique offers many options:
- Program Chorder to trigger up to 31 four-pad scenes, or 11 eight-pad scenes, if your keyboard can transpose over the range from C -2 to G8.
- Once Chorder is set up, you don’t need to interact any more with the pads. It’s not necessary to change banks to trigger scenes in different banks, or have the triggered bank be visible.
- However…interacting with the pads can be pretty cool. For example, you can Mute or Solo pads prior to triggering and alter what a scene plays back. If you have a touch screen or control surface, playing with parameters like pad Pitch while clips are looping is big fun.
- Bring mixing into the picture by assigning pads to specific Impact XT outputs. One application is assigning all bass loops or pads to the same mixer channel. Then, you can fade the bass or pad in and out without having to call up a different scene.
- This isn’t only an EDM technique. For rock, each scene can be drums and a couple different types of percussion loops for song sections like intro, verse, chorus, solo, bridge, outro, etc.
About the CA Scene Launch Tip.song File
This Song has a pre-programmed Chorder Note FX and Impact XT, ready to be loaded with your favorite loops. Connect your MIDI keyboard. C1, D1, E1, and F1 trigger the Bank A rows in Impact XT. G1, A1, and B1 trigger the bottom three rows in Bank B. Once you’ve loaded your loops on the Impact XT pads, you’re ready to start hitting keys and triggering scenes.
Download the CA Clip Launch Tip.song file here.
Make Better Mixes with “Selective EQ”
By Craig Anderton
Good mixes often depend on carving out a unique sonic space for each instrument, so you can hear them clearly. Sometimes carving out that space involves level, like making an instrument softer so that another instrument seems louder. A more sophisticated approach involves EQ, like dipping a piano’s midrange to make more room for the voice.
This tip dives deeper into using EQ to carve out space. It combines spectrum metering with either static or dynamic EQ to make sure two instruments support each other, rather than make one instrument subservient to another.
The four short audio examples have lead guitar and slide guitar playing together. I wanted the lead to be the highlight, but didn’t want to lose the importance of the fluid, aggressive slide guitar in the background. Here’s how I convinced them to coexist.
The first audio example plays the lead solo and slide guitar together. You can almost hear them fighting to try and be the top dog…but we’ll fix that.
Meet Team Spectrum Meter and Pro EQ
The top of Fig. 1 shows the spectrum analysis of the lead guitar part. Unlike the EQ’s spectrum meter, the plugin’s FFT mode can average the level, and retain an infinite hold time. This is key, because the curve unambiguously shows which frequencies are more prominent in the lead guitar part.
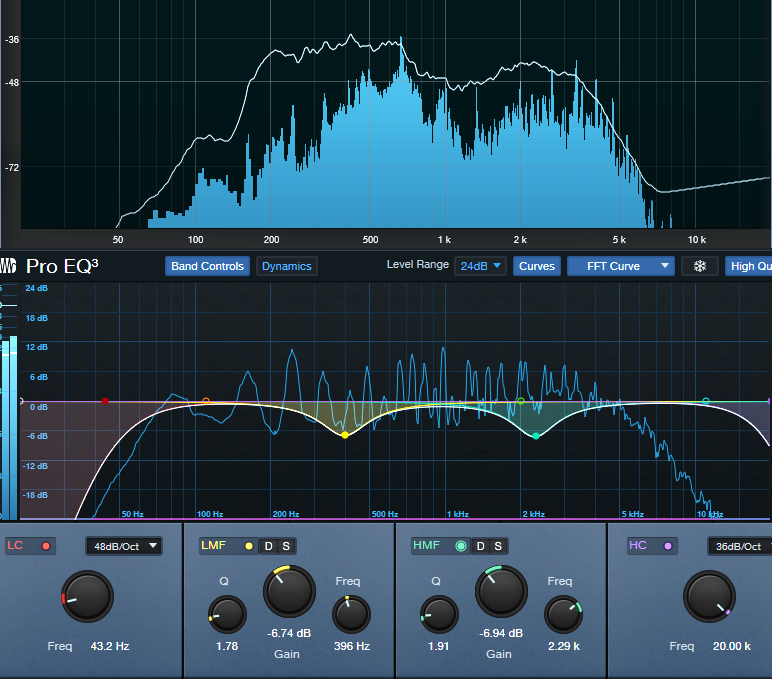
Figure 1: The top image shows the lead guitar’s spectral response. The lower image shows the compensation EQ curve applied to the underlying slide guitar part. The upper row of EQ controls isn’t shown, because its controls aren’t used.
The second audio example uses the static EQ curve in fig. 1 to reduce these frequencies in the slide part. This opens up space for the lead. Now there’s more differentiation between the lead and slide, but the slide still comes through well.
Next, we’ll take this further with dynamic EQ (fig. 2).

Figure 2: Settings for dynamic EQ. Again, the upper row of EQ controls isn’t shown, because its controls aren’t used.
The next audio example uses dynamic EQ, so the slide guitar becomes more prominent in the spaces between notes played by the lead guitar. Now instead of fighting with each other, the lead guitar and slide take turns sharing the spotlight.
Using dynamic EQ is not necessarily better than using static EQ. It depends on the musical context. If you want only the lead to be more prominent, the static EQ sounds better. Because I wanted both parts to be equally important—just better differentiated—I preferred the dynamic EQ.
The final audio example takes the old-school approach of simply lowering the slide guitar part’s level, without any EQ changes. The lead is more prominent, but the overall sound is less interesting and lively compared to how it sounds with EQ (especially dynamic EQ).
But Wait…There’s More!
There’s also a bonus audio example. I posted an Atmos binaural mix of the complete song (headphones only), and a conventional stereo mix (speakers or headphones), on my YouTube channel. These let you hear the tracks above in context, but the examples also provide a follow-up to previous posts about how modest home studios with no surround system can take advantage of Atmos.
The mix is denser than the previous Atmos vs. stereo example mentioned in the blog postRelease Your Music in Stereo and Immersive, and uses the technique described in Make Stereo Downmixes Feel More Immersive. If you haven’t taken advantage of Atmos yet, listen to the binaural Atmos version for headphones, then listen to the conventional stereo version. Despite my efforts to make the stereo version sound as much like the Atmos version as possible, the Atmos mix is fuller, bigger, and has more depth. Remember, all you need to get started with Atmos mixing is Studio One Professional and a set of headphones. Give it a shot!
Multitimbral Magic with MIDI Guitar
By Craig Anderton
MIDI guitars are a niche product, because the learning curve can be daunting for some guitar players. However, I’m surprised how many professionals have adopted MIDI guitar not as a guitar replacement, but as a creative, expressive voice that neither guitars nor keyboards can duplicate.
Thanks to ongoing controller improvements, and a better understanding of what MIDI guitar does best, I’m using it more than ever. But a big part of my renewed interest in MIDI guitar is Studio One’s MPE support, and the ability to let a single MIDI guitar serve as multiple simultaneous External Devices. Let’s dig deeper.
Most MIDI guitars offer two playing modes:
- Poly mode, where all data from all strings appears over 1 channel.
- Mono mode, where each string generates data over its own MIDI channel.
With multitimbral instruments, a MIDI guitar in mono mode can use each string to drive its own instrument. For example, the bottom three strings could drive a bass, while the upper three strings drive a polysynth sound. In theory, that’s cool—but there’s a drawback. In some applications, you might prefer to have the polysynth sound respond to all six strings. Yet, mono mode reserves three of those strings for bass.
Fortunately, Studio One has a simple solution: Create two MIDI guitar External Devices. Set up one for Mono mode, and the other for Poly mode (or if available, MPE mode—or even External Devices for all three modes). Then, drive the bass strings with the Mono mode external device, and the polysynth sound with the Poly or MPE mode device. Here’s how to do it.
Setting Up the External Devices
Creating the external devices for Mono and Poly modes is simple (fig. 1). The only difference is that the Mono mode device selects Split Channels, while the Poly device does not.
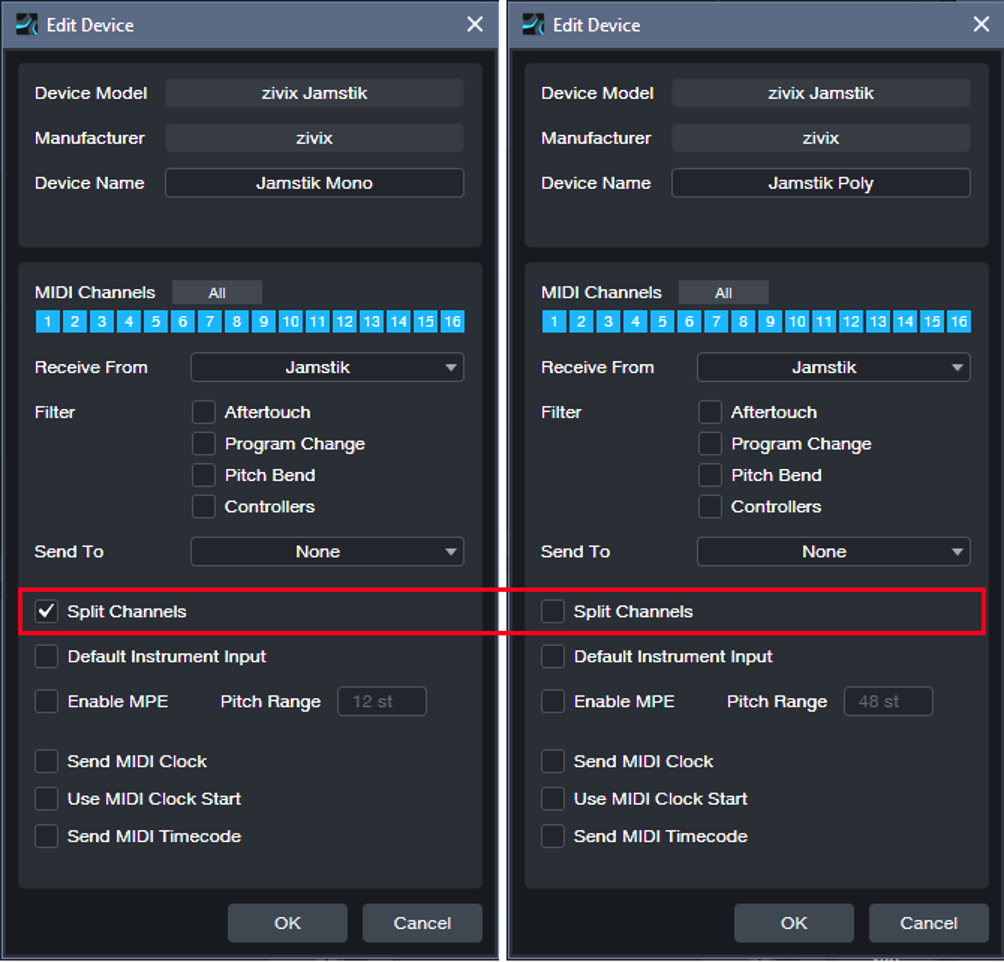
Figure 1: External Device setup for (left) Mono and (right) Poly mode MIDI guitar, using the Zivix Jamstik.
Fig. 2 shows the Studio One setup. SampleTank’s Polysynth responds to data over Channel 1. It also has three bass presets that respond to data over channels 4, 5, and 6.
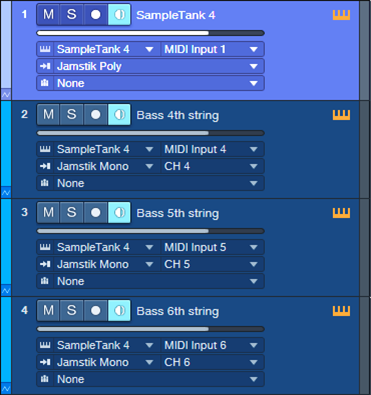
Figure 2: Track setup for driving a multitimbral synth with MIDI guitar.
Tracks 2, 3, and 4 use the Mono mode external device. These tracks accept data from channels 4, 5, and 6 respectively, which correspond to the guitar’s three bottom strings. The tracks output their data to the like-numbered SampleTank channels. That takes care of driving the bass presets.
Meanwhile, Track 1 uses the Poly mode external device. So, SampleTank’s Polysynth preset responds to all MIDI data coming in from all the guitar strings. Now we’ve layered chords played by the Polysynth with bass notes from the bass presets.
Enter MPE
My main guitar controller, the Jamstik Classic MIDI Guitar, offers an MPE mode in addition to Mono and Poly. Studio One’s MPE implementation doesn’t support using channelized multitimbral instruments with MIDI guitar. However, this is not an issue with Studio One’s bundled instruments, which aren’t multitimbral but support MPE. So, my third External Device for Jamstik is set up for MPE. External Device setup is like any other MPE controller. Tick the Enable MPE check box, choose the MIDI controller in Receive From, and select the appropriate Pitch Range (typically 48 semitones).
In the example given above, SampleTank doesn’t support MPE so it was necessary to use Poly mode to control its Polysynth sound. Poly mode has limitations, like not handling string bending for individual strings, and more tracking issues than Mono mode. But if we use the Jamstik’s MPE mode to drive the MPE-friendly Mai Tai, we can layer the Mai Tai’s polysynth presets with SampleTank’s bass sound. Compared to Poly mode, using MPE with the Mai Tai gives better tracking and per-string note bends that don’t influence other notes that are sounding. Fig. 3 shows the setup.
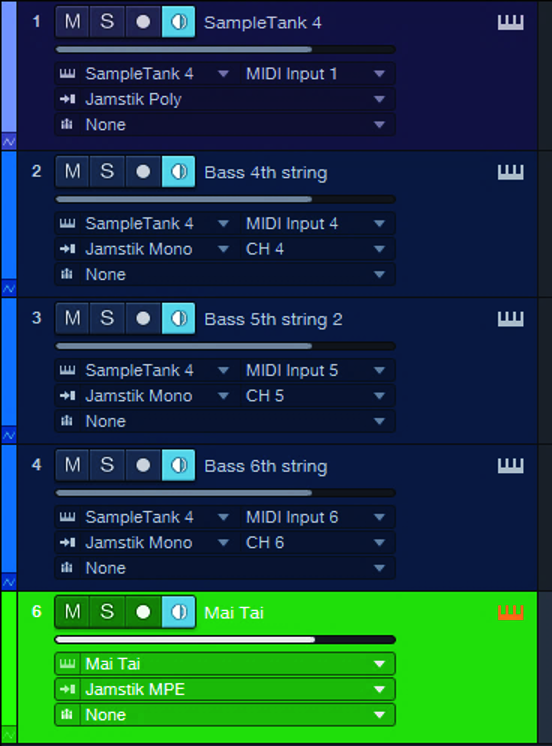
Figure 3: SampleTank and Mai Tai are layering bass sounds and a polysynth preset, respectively.
And here’s one more trick: Note that I’m still using the Poly External Device to drive SampleTank. Turning off pitch bend in SampleTank’s Polysynth eliminates most of the challenges involved with responding to Poly Mode, so the final sound becomes 3 individually articulated bass notes, 1 Mai Tai MPE synth for leads and rhythm with pitch bend articulations, and 1 layered SampleTank preset—thanks to optimized External Devices from a single MIDI guitar for each of them.
There’s no problem with using three External Devices from the same instrument. When you add another device with the same Receive From entry, Studio One will warn you that “Connecting multiple devices to the same port may lead to copied transmission of MIDI events.” You can safely ignore that, because we want copied transmission of MIDI events.
So, does it sound big? Listen to this short snippet recorded in real time with no editing, and decide for yourself.
Avoid Collaboration Concerns
By Craig Anderton
As the universe of Studio One users grows, so do opportunities for collaboration. But your collaborator may not be using the same version of Studio One as you—it could be a version of Artist that came with an interface, or the latest and greatest version of Studio One Professional. Or maybe the program wasn’t updated for some reason, like cash flow issues, or being dependent on ReWire. Fortunately, most of the time projects done in one version of Studio One can translate to other versions. So, here are some guidelines to keep in mind when collaborating.
Resolving Song Formats
Songs are generally incompatible with previous Studio One versions. However, you don’t have to transfer an entire song file. Use Export Mixdown to generate a rough premix. Whoever wants to record an overdub(s) can do so while listening to the premix. Then, the overdub stems can be exported as audio files, and added to the original project.
It’s crucial that all files have the same start point. For example, if there’s a solo halfway through the song, extend the solo’s beginning by drawing a blank section with the Paint tool. Then, bounce the blank beginning and the overdub together before exporting the stem.
Third-Party Plugin Issues
I prefer using as many native Studio One plugins as possible, not only because it’s a solid selection, but because that minimizes the chance of needing third-party plugins that one or the other person doesn’t have. However, for third-party plugins, this is an instance where subscription-based software can work in your favor. You may be able to subscribe to the plugins you don’t have for long enough to use them in a project, and then stop subscribing.
Using Professional FX Chains in Artist
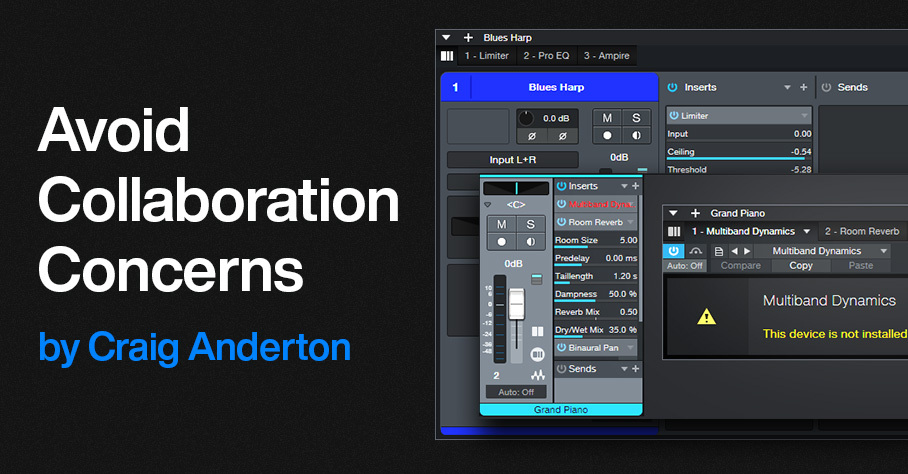
If the FX Chain consists of a serial chain of effects, and both collaborators have the same plugins, the FX Chain will be compatible with both Professional and Artist. Although there’s no Channel Editor or Macro Controls in Artist, users can take advantage of the Micro Edit view in the mixer or in the Channel Overview (fig. 1). This allows editing several important parameters without having to open effects in the chain.
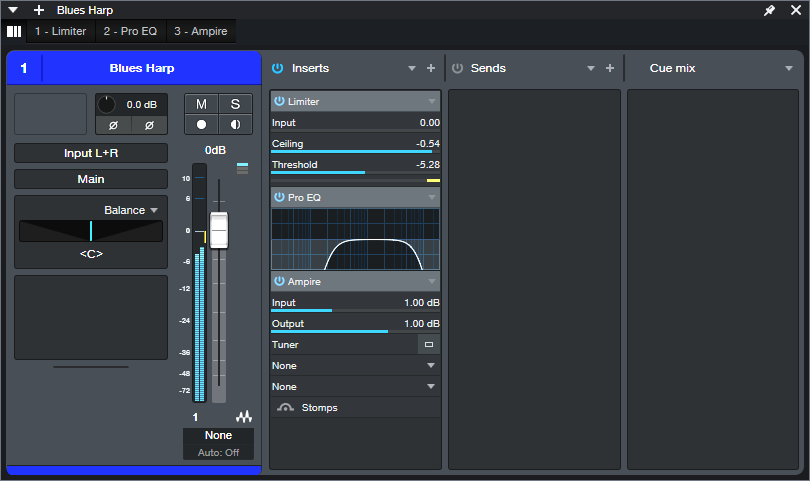
Figure 1: The Micro Edit view is useful for quick edits when the Channel Overview is open.
Missing Plugin: If an Artist user is missing a plugin you have in Professional, they’ll see an error message like fig. 2.
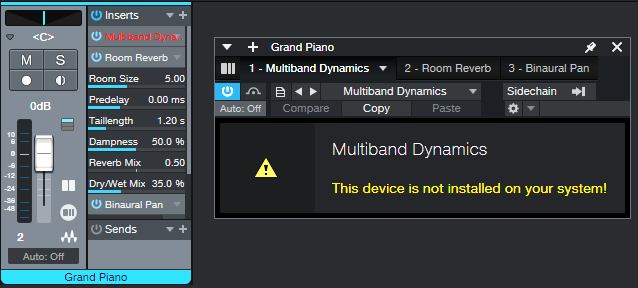
Figure 2: Studio One Artist doesn’t include the Multiband Dynamics processor.
This is helpful, because you can then substitute a plugin that gives a sound close to what’s needed (in this case, the Tricomp may work), create a new FX Chain, and send it to your collaborator.
FX Chains with a Splitter: Artist doesn’t include the Splitter, so it won’t recognize parallel paths in a Professional FX Chain that incorporates a Splitter. Instead, Artist rearranges the FX Chain to put all the effects in series (fig. 3). Note that there’s no error message to alert the user there’s a potential problem.
Figure 3: Originally, a frequency-based Splitter bi-amped two Ampires in parallel. Artist translated the chain into a series chain of effects that placed the two Ampires in series, without a way to bi-amp them.
In a case like this, when you send a song file, put as many of the series effects as you can in an FX Chain. In Artist, you would then use an input track and buses to split the audio (fig. 4).
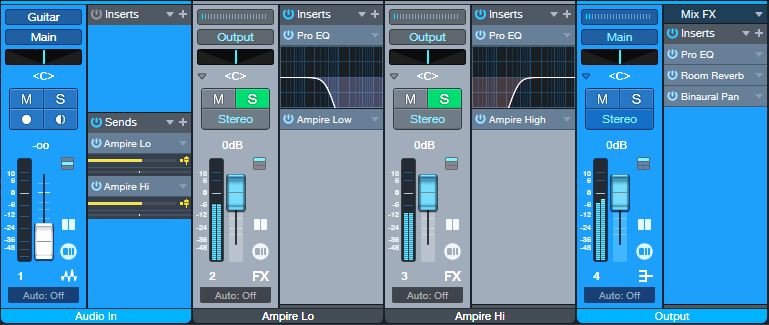
Figure 4: To replace frequency-split functionality, the Audio In channel splits the audio by sending it to two FX Channels. Each FX Channel has a Pro EQ3 to split based on frequency, which then feeds an Ampire. The Output channel includes the post-Ampire effects. You can save these as an FX Chain.
Even though the effect order changes in Artist, the effect parameter settings remain intact. If the user knows what the routing is supposed to be, simply create a track layout with the required tracks and buses, and drag the effects from the FX Chain that loaded in Artist to the additional tracks and buses. (This can get messy if there are several frequency splits, but it’s still doable with a stand-alone splitter plugin like TB Pro Audio’s ISOL8.)
FX Chain Backward Compatibility with Studio One Professional
Assuming the source and target programs have the same plugins used in the FX Chain, backward compatibility is rarely an issue.FX Chains created in Studio One 6 can load in versions 3, 4, and 5 (FX Chains didn’t exist before version 3). However, version 3 was before the Splitter was introduced. So, Studio One 3 Professional rearranges FX Chains with a Splitter into a series connection, the same way Artist does. You’d resolve the issue the same way you would in Artist. But seriously—if you’re collaborating with some who uses Studio One 3, gently suggest that they stop buying coffee at Starbucks for a while, and at least get Studio One 6 Artist.
Studio One Professional Track Preset Compatibility
Track Presets are exclusive to Studio One Professional. Also note that Track Presets were introduced in version 6, so as expected, they won’t load in previous versions.
When dealing with Studio One Artist users (or Professional users who haven’t installed version 6 yet), deconstruct any Track Preset you use into its components (similarly to fig. 4 above). Take a screenshot and send that to your collaborator.
Of Course, the Best Solution is Staying Updated
Given how many free updates there are between Studio One versions, there’s really no reason not to update. But sometimes, you’ll run into situations where for one reason or another, someone hasn’t updated their program or is using a different version—and now you have some solutions for carrying on with your collaboration.
Create Rhythmic Alchemy with the BeatCoder
By Craig Anderton
Over three years ago, I wrote a blog post on how to make a “drumcoder.” Its design was somewhat like a vocoder—drum audio served as a modulator for a carrier (e.g., a synth pad or guitar power chord). However, because the goal was not to process voice, the sound was warmer and more organic than traditional vocoding.
Unfortunately, the effect was super-complex to put together, and was practical only if you had Studio One Professional. But, no more: Dynamic EQ can take the concept to the next level. The BeatCoder is a much improved—and far simpler—version of the Drumcoder. Even better, it works with Studio One Artist and Professional. Let’s take a listen…
Fig. 1 shows one way to do BeatCoding.
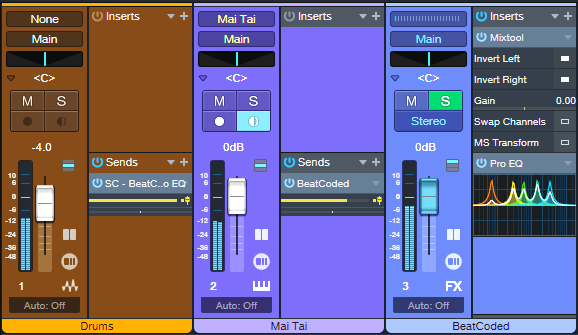
Figure 1: BeatCoder channel layout.
Let’s look at the Mai Tai “carrier” first. The Mai Tai track (or other sound of your choice) typically provides a sustained pad or similar sound. A Send goes to the BeatCoded FX Channel, which is in parallel with the Mai Tai and includes a Mixtool. The Mixtool inverts the left and right channels, so the BeatCoded track is out of phase with the Mai Tai. This causes the carrier sound to cancel.
The magic happens because of the Pro EQ3 in the BeatCoded track. The Drums track has a pre-fader send that feeds the Pro EQ3’s sidechain. By using the Pro EQ3’s Dynamic mode (fig. 2), the drum dynamics boost particular frequencies in the BeatCoded track in time with the beat. In the audio example, you’ll hear a drum loop driving the dynamic EQ as it processes a Mai Tai pad.
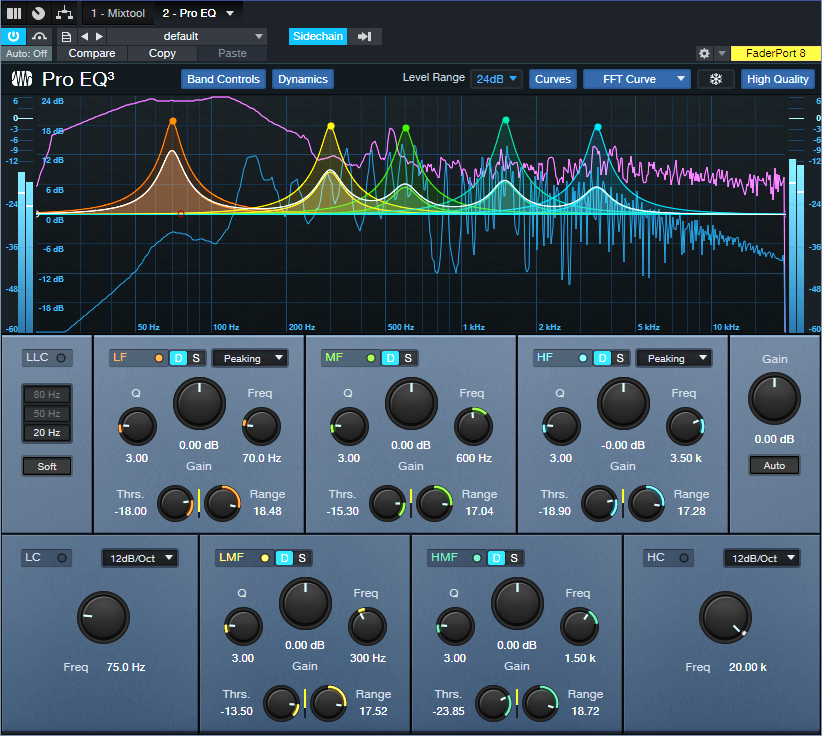
Figure 2: EQ settings used in the audio example.
Editing the Parameters
The editing possibilities are enormous:
- The EQ frequencies can cover various ranges. The Low and High Shelf EQs are in play as well as the Peaking filter type. You can even tune the EQ stages to different drums to have the synth sound respond super-tightly to the drum sounds.
- Higher Q settings are more dramatic, but can lead to overloads. Trim the synth/pad/power chord’s level if needed. You may also need to trim the Pro EQ3’s output level if the peaks distort.
- Each stage’s Range sets how much boost the EQs will receive from drum frequencies in the stage’s range. Threshold sets the level above which the drums affect the EQ.
- The Solo buttons for the various EQ stages help when getting to know this effect. They make it easy to set the Threshold and Range for a balanced response to dynamics (assuming that’s what you want).
- The pre-fader Send from the Drums track adjusts the amount of cancellation. Moving it off center lets through more of the synth sound. This is a very sensitive control, so it’s easy to miss where there’s maximum cancellation.
- Note that it’s not possible to have total cancellation, so that you hear only the effect of the EQ. EQs based on analog modeling have unavoidable phase shifts, which causes some leakage between the bands.
Other Implementations
The implementation shown above is simple and flexible, but it’s not the only one.
- You could create an FX Chain with the plugins from the BeatCoder track in fig. 1, insert the FX Chain in an Instrument track, and save the combination as an Instrument + FX preset. The Pro EQ3’s sidechain would still be accessible to an audio track with drums or a different audio source.
- The Pro EQ3 sidechain acts like a bus, because it can receive multiple inputs. So, if a drum module had individual outputs, particular drums could feed the sidechain selectively.
- The Range can also go negative, where the drums cut the response instead of boost it. This creates a more subtle effect, but can be useful in ambient and other forms of chill music.
Take the time to set this up, and play with it for a while. Warning: The results can be habit-forming.